Crochet Watermelon Bag in Any Size - Free Crochet Pattern

Thursday 21 April 2022

This is a free pattern to crochet this super cute watermelon bag. It can be made in any size, and it's also no-sew! The only sewing is in weaving in the ends, and embroidering the seeds.

There is a full YouTube tutorial for this bag here


Yarn used

- Hobbii Baby Snuggle

    - Soft Pink
    - White
    - Grass

- Small amount of medium weight black yarn for embroidering seeds OR black beads and thread

Other Items used

- US G/4.25mm Crochet Hook (or a hook to match the yarn you're using)

- Yarn needle

- Scissors

- Stitch markers

Abbreviations and Stitches

• MR: Magic ring 
• St(s): Stitch(es) 
• SC: Single crochet
• Ch: Chain Stitch
• Sl St: Slip Stitch
• Inc: Increase (Stitch 2 SC into the stitch) 
• (...) x n: Repeat instructions in brackets n times
**This pattern uses US Crochet Terms**

Pattern Notes

- The ch 1 at the beginning of each row counts as a stitch
- This means the first increase of each row will be in the 3rd stitch from the hook
- Pattern can be increased to any size, following the same progression of stitches. The pattern progression is as below:


Pattern


We will make two semi circles and join them together

Semi circle - make 2

Remember: 
- The ch 1 at the beginning of each row counts as a stitch
- This means the first increase of each row will be in the 3rd stitch from the hook

R1: 6 SC in a MR (do not join)
R2: Ch 1, turn, inc, SC, inc, SC, inc (9)
R3: Ch 1, turn, inc, 2SC, inc, 2SC, inc, SC (12)
R4: Ch 1, turn, inc, 3SC, inc, 3SC, inc, 2SC (15)
R5: Ch 1, turn, inc, 4SC, inc, 4SC, inc, 3SC (18)
R6: Ch 1, turn, inc, 5SC, inc, 5SC, inc, 4SC (21)
R7: Ch 1, turn, inc, 6SC, inc, 6SC, inc, 5SC (24)
R8: Ch 1, turn, inc, 7SC, inc, 7SC, inc, 6SC (27)
R9: Ch 1, turn, inc, 8SC, inc, 8SC, inc, 7SC (30)
R10: Ch 1, turn, inc, 9SC, inc, 9SC, inc, 8SC (33)
R11: Ch 1, turn, inc, 10SC, inc, 10SC, inc, 9SC (36) 


(I did 11 rows of pink. However, you can do as many as you like, following the same progression)

Colour change to white 

(If you did more rows, just follow on the progression to do 2 rows of white)
R12: Ch 1, turn, inc, 11SC, inc, 11SC, inc, 10SC (39)
R13: Ch 1, turn, inc, 12SC, inc, 12SC, inc, 11SC (42)

Colour change to green
(If you did more rows, just follow on the progression to do one row of green)
R14: Ch 1, turn, inc, 13SC, inc, 13SC, inc, 12SC (45) 


(If you did more rows, just do one SC in BLO of each stitch of previous row)
R15: Ch 1, turn, 44SC in BLO (45)


For the 1st semi circle only: close and cut yarn after your last row
For the 2nd semi circle only: DO NOT close or cut yarn. We are going to join the semi circles together.


Join the semi circles

Place the semi circles RIGHT SIDES TOGETHER, and sl st across both sides all the way across

Hint: You can determine the right side, because the last row of BLO SC curves the semi circle backwards as per the image below:


NB: The bag is now inside out. Turn it the right way around again. The seam from the slip stitches should be on the inside.


Straps

Using stitch markers, mark where you want the straps to start and end (2 stitch markers per side)


Continue crocheting with green; we are now going to work in rounds to do the straps

R1: Ch 1, SC into the end of each row until you reach the first stitch marker
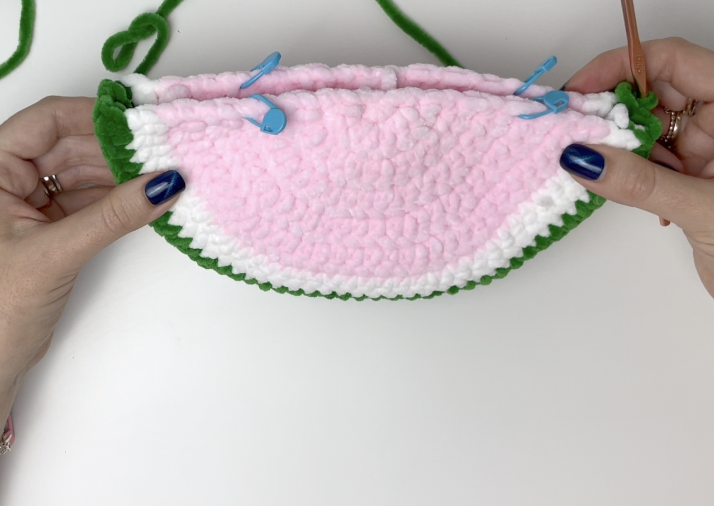
Ch enough stitches to make the strap the length you want (I do 25 ch)

SC into the stitch marked by the next stitch marker
SC into the end of each row around, until the next stitch marker. Chain the same amount as the first strap
SC into the next stitch marker and the rest of the way around the bag
Sl st to join to the first SC of the round

R2: Ch 1, SC into each st from R1 (including all ch sts). Sl st to join to first SC of round


Close and cut the yarn. Weave in all ends.

Seeds

Use a long length of medium weight black yarn to embroider the seeds, or sew the black beads on to the bag with thread


Read More

Crochet Squishy Eggplant - Free Crochet Pattern

Friday 1 April 2022


This is a crochet pattern to make this adorable squishy eggplant.

There is a full Youtube tutorial to crochet this eggplant here.


Yarn used

- Hobbii Baby Snuggle

    - Orchid
    - Sage
    - Soft Pink

- Small amount of medium weight black yarn for embroidering mouth and eyelashes

Other Items used

- US G/4.25mm Crochet Hook (or a hook to match the yarn you're using)

- 12-15mm safety eyes

- Poly fill

- Yarn needle

- Stitch markers -optional

Abbreviations and stitches

• MR: Magic ring 
• St(s): Stitch(es) 
• SC: Single crochet
• Ch: Chain Stitch
• Sl St: Slip Stitch
• Sk: Skip a stitch
• Dec: Decrease using the invisible method
• DC: Double Crochet
• HDC: Half Double Crochet
• TR: Treble Crochet
• Inc: Increase (Stitch 2 SC into the stitch) 
• (...) x n: Repeat instructions in brackets n times
**This pattern uses US Crochet Terms**


Pattern

Using purple yarn:
R1: 6 SC in a MR
R2: 6 inc (12)
R3: (SC, inc) x 6 (18)
R4: (2SC, inc) x 6 (24)
R5: (3SC, inc) x 6 (30)
R6: (4SC, inc) x 6 (36)
R7: (5SC, inc) x 6 (42)
R8: (6SC, inc) x 6 (48)
R9-20: 48SC (12 rounds of 48)

Place safety eyes between R12 and R13, about 10 sts apart

R21: (4SC, dec) x 8 (40)
R22: (3SC, dec) x 8 (32)
R23: (2SC, dec) x 8 (24) 
Start to stuff the piece
R24: (SC, dec) x 8 (16)
Finish stuffing
R25: 8 dec (8)
Close and cut the yarn, leaving a tail for sewing. Sew the hole closed. 

Leaves

Using green yarn:
R1: 6 SC in a MR
R2: 6 inc (12)
R3: (SC, inc) x 6 (18)
R4: (2SC, inc) x 6 (24)
R5: (3SC, inc) x 6 (30)
R6: (4SC, inc) x 6 (36)
R7: (8SC, inc) x 4 (40)

R8: (SC, ch 5, SC in 2nd ch from hook, HDC, DC, TR in last ch, sk 2 st on circle, SC in next st) x 10
(10 leaves)
Sl st to close. Cut the yarn, leaving a long tail for sewing.

Sew on to the top of the eggplant.
(I only sew on the tips and bases of the leaves)

Stem

Attach yarn at the top of the eggplant and leaves

Ch 6. Starting in 2nd ch from hook: 5SC back along ch

Close and cut yarn. Tie yarn tails together and pull knot into the piece

Finishing details


Embroider the cheeks using pink yarn

Embroider the eyelashes and mouth using black yarn


Read More