Crochet Donut Pig - Free Crochet Pattern

Saturday 29 January 2022


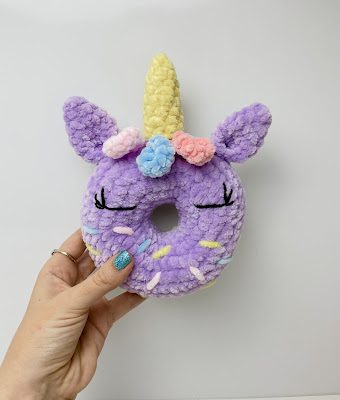
This is a crochet pattern to make this super cute donut pig!

You'll need to start by making the plain donut. You can find the pattern for the basic donut here.
There is a full Youtube tutorial to create the basic donut here


Then we add on the ears, snout and tail!
There is a full video on the steps to create the donut pig here!


Yarn used

James C Brett Flutterby Chunky:
- Light pink (body)
- Medium pink (ears, snout, tail)

Rainbow Cotton 8/4
- Black (nostrils)

Other Items used

- US G/4.25mm Crochet Hook
- 9mm safety eyes
- Yarn needle
- Poly fill
- Stitch markers -optional
*Please note that safety eyes are NOT recommended for children under the age of 3 years.

Abbreviations and stitches

• MR: Magic ring 
• St(s): Stitch(es) 
• SC: Single crochet 
• Inc: Increase (Stitch 2 SC into the stitch) 

• (...) x n: Repeat instructions in brackets n times
**This pattern uses US Crochet Terms**


Pattern

Create the original donut body as per the basic donut pattern, in light pink
BUT:
- no sprinkles (or only sprinkles on bottom half)
- attach safety eyes on one half before sewing together
- Between R5 and R6
- 8 sts apart

Snout

In medium pink yarn:
Ch 5. SC in 2nd ch from hook, 2SC back along ch, 3SC in last ch 
Underside: 2SC, inc, sl st back to 1st st 
Close and cut the yarn, leaving a long tail for sewing


Ears - Make 2 

In medium pink yarn:
R1: 4SC in a MR 
R2: (SC, inc) x 2 (6) 
R3: (2SC, inc) x 2 (8) 
R4: 8SC 

Fold flat, and SC across top to close 
Close and cut the yarn, leaving a long tail for sewing


Assembly

Sew the snout on to the donut, just below the eyes
Sew the ears on to the top of the donut, slightly further apart than the eyes
Embroider the nostrils, using black yarn

Tail

Attach the yarn at the back of the donut, and ch 11.
Starting in 2nd ch from hook: SC back along ch (10)
Close and cut the yarn. Knot the tails together, and pull the knot into the piece.


Read More

Crochet Narwhal - Free Crochet Pattern

Sunday 16 January 2022


This is a crochet pattern to make this super cute, super chonky narwhal. 

You'll need to start by making the original whale pattern

Then follow the pattern below to make the horn, and attach it to the whale to make a narwhal!

There is a full Youtube tutorial for this narwhal here


Yarn used

James C Brett Flutterby Chunky
- Small amount for the horn

Other Items used

- US G/4.25mm Crochet Hook
- Yarn needle
- Poly fill
- Stitch markers -optional

Abbreviations and stitches

• MR: Magic ring 
• St(s): Stitch(es) 
• SC: Single crochet 
• Inc: Increase (Stitch 2 SC into the stitch) 

• (...) x n: Repeat instructions in brackets n times
**This pattern uses US Crochet Terms**

Pattern (Horn)


R1: 4 SC in a MR
R2: (SC, inc) x 2 (6)
R3-4: 6SC
R5: (2SC, inc) x 2 (8)
R6-8: 8SC

Sl st to close. Cut the yarn, leaving a long tail for sewing.
Stuff the horn
Sew the horn to the top of the whale’s head, about 4 to 5 rounds from the last round on the head.


Read More

Crochet Chonky Whale - Free Pattern


This is a crochet pattern to make this super cute, super chonky whale.

I have wanted to design a whale for a while, but couldn't work out whether to design it from the back to the front, front to back, or top to bottom! Each way of working up the whale has various benefits in terms of the overall shape. Eventually I decided to start at the tail, and then work towards the body, making the body increase towards the top to give this cute chunky shape! The tail naturally curves up as well, which makes it super cute.

There's very little sewing in this pattern. You only need to sew on the fins at the end. That's a win in my books!

You can even turn this whale into a narwhal! To make the horn for the narwhal, you can use the horn pattern here.

There is a full Youtube tutorial to create this whale here


Yarn used

James C Brett Flutterby Chunky
- Less than half of a 100g skein

Other Items used

- US G/4.25mm Crochet Hook
- 9mm safety eyes
- Yarn needle
- Poly fill
- Stitch markers -optional
*Please note that safety eyes are NOT recommended for children under the age of 3 years.

Abbreviations and stitches

• MR: Magic ring 
• St(s): Stitch(es) 
• SC: Single crochet 
• Inc: Increase (Stitch 2 SC into the stitch) 

• Dec: Decrease using the invisible method

• (...) x n: Repeat instructions in brackets n times
**This pattern uses US Crochet Terms**

Pattern

We crochet the whale starting at the tail fins, and moving towards the front.

Tail fins

- Make 2

R1: 4 SC in a MR
R2: (SC, inc) x 2 (6)
R3: (2SC, inc) x 2 (8)
R4: 8 SC
R5: (3SC, inc) x 2 (10)
R6: 10SC

For the first tail fin only:
Close and cut the yarn after R6, leaving a tail for sewing 

For the second tail fin only:
Don’t close after R6. 
Join to 1st tail fin with 1SC
(this is first st of R1 of body - place a marker in this st) 

For more detailed instruction on joining the tail fins, please see the video tutorial 

Body

Continue straight on to the body
The first st of R1 was done in the previous step to join the tail fins together

R1: (2SC, dec) x 5 (15)
(This means it’s 2SC, dec, 2SC, dec, 2SC on 1st fin, and dec, 2SC, dec, 2SC, dec on 2nd fin)

R2: (3SC, dec) x 3 (12)
(The first st of R2 goes into the marked SC used to join the tail fins)

Use the tail from the end of the first fin to sew the hole between the tail fins closed 

R3: 12 SC
R4: (SC, inc) x 6 (18)
Make a few sts to get to the middle of the bottom of the whale, right between the tail fins. This is your new end of round 4 

R5: 4SC, inc, (2SC, inc) x 3, 4SC (22)

Stuff the tail fins

R6: 5SC, inc, 3SC, inc, 2SC, inc, 3SC, inc, 5SC (26)
R7: 6SC, inc, 3SC, inc, 4SC, inc, 3SC, inc, 6SC (30)

Make a few sts to get to middle of the bottom of the whale. This is your new end of round 7

R8: 6SC, inc, 3SC, inc, (2SC, inc) x 3, 3SC, inc, 6SC (36)
R9: 11SC, inc, 12SC, inc, 11SC (38)
R10: (12SC, inc) x 2, 12SC (40)
R11: 13SC, inc, 12SC, inc, 13SC (42)
R12-18: 42SC (7 rounds of 42)
R19: (5SC, dec) x 6 (36)
R20: (4SC, dec) x 6 (30)
R21: (3SC, dec) x 6 (24)

Partly stuff the whale

R22: (2SC, dec) x 6 (18)

Attach the eyes, between R18 and R19, 12 sts apart, at the underside of the whale

R23: (SC, dec) x 6 (12)
Finish stuffing the whale
R24: 6 dec (6)
Close and cut the yarn, leaving a tail for sewing. Sew the hole closed and weave in the end.

Fins

- Make 2

R1: 4 SC in a MR
R2: 4 inc (8)
R3-5: 8 SC (3 rounds of 8) 

Fold the fin flat, and SC along both sides to close.

Close and cut the yarn, leaving a tail for sewing.

Assembly

Sew the fins to the sides of the whale, starting about 3 sts behind the eyes. 


Read More

Crochet Unicorn Donut - Free Pattern

Saturday 8 January 2022


Free Unicorn Donut Crochet Pattern

This is a crochet pattern to make this super cute unicorn donut. You can make them in all sorts of colours!

You'll need to start by making the plain donut. You can find the pattern for the basic donut here.
There is a full Youtube tutorial to create the basic donut here


Then we add on the ears, horn and hair!

There is a full video tutorial for the unicorn donut here


Yarn used

Hobbii Baby Snuggle:
- Body colour (ears)
- Yellow/ cream (horn)
- Various colours for hair

Other Items used

- US G/4.25mm Crochet Hook
- Yarn needle
- Poly fill
- Stitch markers -optional

Abbreviations and stitches

• MR: Magic ring 
• St(s): Stitch(es) 
• SC: Single crochet 
• Inc: Increase (Stitch 2 SC into the stitch) 

• (...) x n: Repeat instructions in brackets n times
**This pattern uses US Crochet Terms**

Pattern

Create the original donut body as per the basic donut pattern 
BUT only do sprinkles on the bottom half of the donut. The unicorn accessories go on the top half!

Horn

Use yellow/cream yarn

R1: 4 SC in a MR
R2: (SC, inc) x 2 (6)
R3-4: 6SC
R5: (2SC, inc) x 2 (8)
R6-7: 8SC
R8: (3SC, inc) x 2 (10)
R9: 10SC
Sl st to close. Cut the yarn, leaving a long tail for sewing.

Ears - Make 2

Use main body colour yarn

R1: 4SC in a MR
R2: (SC, inc) x 2 (6)
R3: (SC, inc) x 3 (9)
R4: (2SC, inc) x 3 (12)
R5-6: 12SC
Fold in half, SC closed along top
Close and cut the yarn, leaving a tail for sewing.

Assembly

Sew the horn on to the head.  (The back of the horn should be where the frosting colour and beige colour meet)

Sew the ears on to the head - about 3 stitches either side of the horn

Embroider the eyes as desired, using black yarn 


Hair

Insert hook just below the horn and pull through a loop of the desired hair colour.
Ch 11 (or any other length you prefer)
Start in 2nd ch from the hook: SC back along chain (10)
Close and cut the yarn
Tie the tails together and weave in the ends
Attach more hair to the left and to the right, using the same method


Read More

Crochet Donut - Free Crochet Pattern

Monday 3 January 2022


This is a crochet pattern to make this super cute donut. You can make them in all sorts of colours!
I wanted a donut that wasn't too big and wasn't too small, when worked with plush yarn. I like this size because it's just a bit bigger than a real donut!

There is a full Youtube tutorial to create this donut here


If you want to turn your donut into something else, please check out my Donut Pals!

You can find the pattern for the Donut Pig here


You can find the pattern for the Donut Frog here

There are also full Youtube tutorials for each of these Donut Pals!


Basic Donut

Yarn used

Hobbii Baby Snuggle:
- Beige (underside)
- Frosting colour
- Sprinkles colours

Other Items used

- US G/4.25mm Crochet Hook
- Yarn needle
- Poly fill
- Stitch markers -optional

Abbreviations and stitches

• MR: Magic ring 
• St(s): Stitch(es) 
• SC: Single crochet 
• Inc: Increase (Stitch 2 SC into the stitch) 

• (...) x n: Repeat instructions in brackets n times
**This pattern uses US Crochet Terms**

Pattern

Make 2: one in beige and one in the frosting colour. 
One of these pieces should have a long tail to start and finish. 

(Leave a long tail to start, for one colour only) 
Slip knot, Ch 20. SC to first st to join, to form a ring (this is first st of R1) 

R1: (4SC, inc) x 4 (24) 
R2: (3SC, inc) x 6 (30)
R3: (4SC, inc) x 6 (36) 
R4: (5SC, inc) x 6 (42) 
R5: (6SC, inc) x 6 (48) 
R6-8: 48SC 

Sl st to close, and cut the yarn. (Leave a long tail for one of the colours only) 

Assembly

Use the long tail from the centre of the donut to sew the centres together. 

Use the long tail from the outside the donut to sew the outer edges together, stuffing as you go.

Embroider the sprinkles on to the donut.


Read More