*Please note that safety eyes are NOT recommended for children under the age of 3 years.
Abbreviations and stitches
• MR: Magic ring
• St(s): Stitch(es)
• SC: Single crochet
• HDC: Half Double Crochet
• BLO: Back loops only
• FLO: Front loops only
• Inc: Increase (Stitch 2 SC into the stitch)
• Dec: Decrease using the invisible method
• (...) x n: Repeat instructions in brackets n times
• Bobble:
Yarn over, insert the hook, yarn over, pull through a loop. DO NOT complete the stitch. Repeat the steps 5 times in total. There should be 11 loops on the hook.
Yarn over and pull through all 11 loops on the hook to complete the stitch.
Please see the video tutorial for further detailed instruction on this
**This pattern uses US Crochet Terms**
Pattern
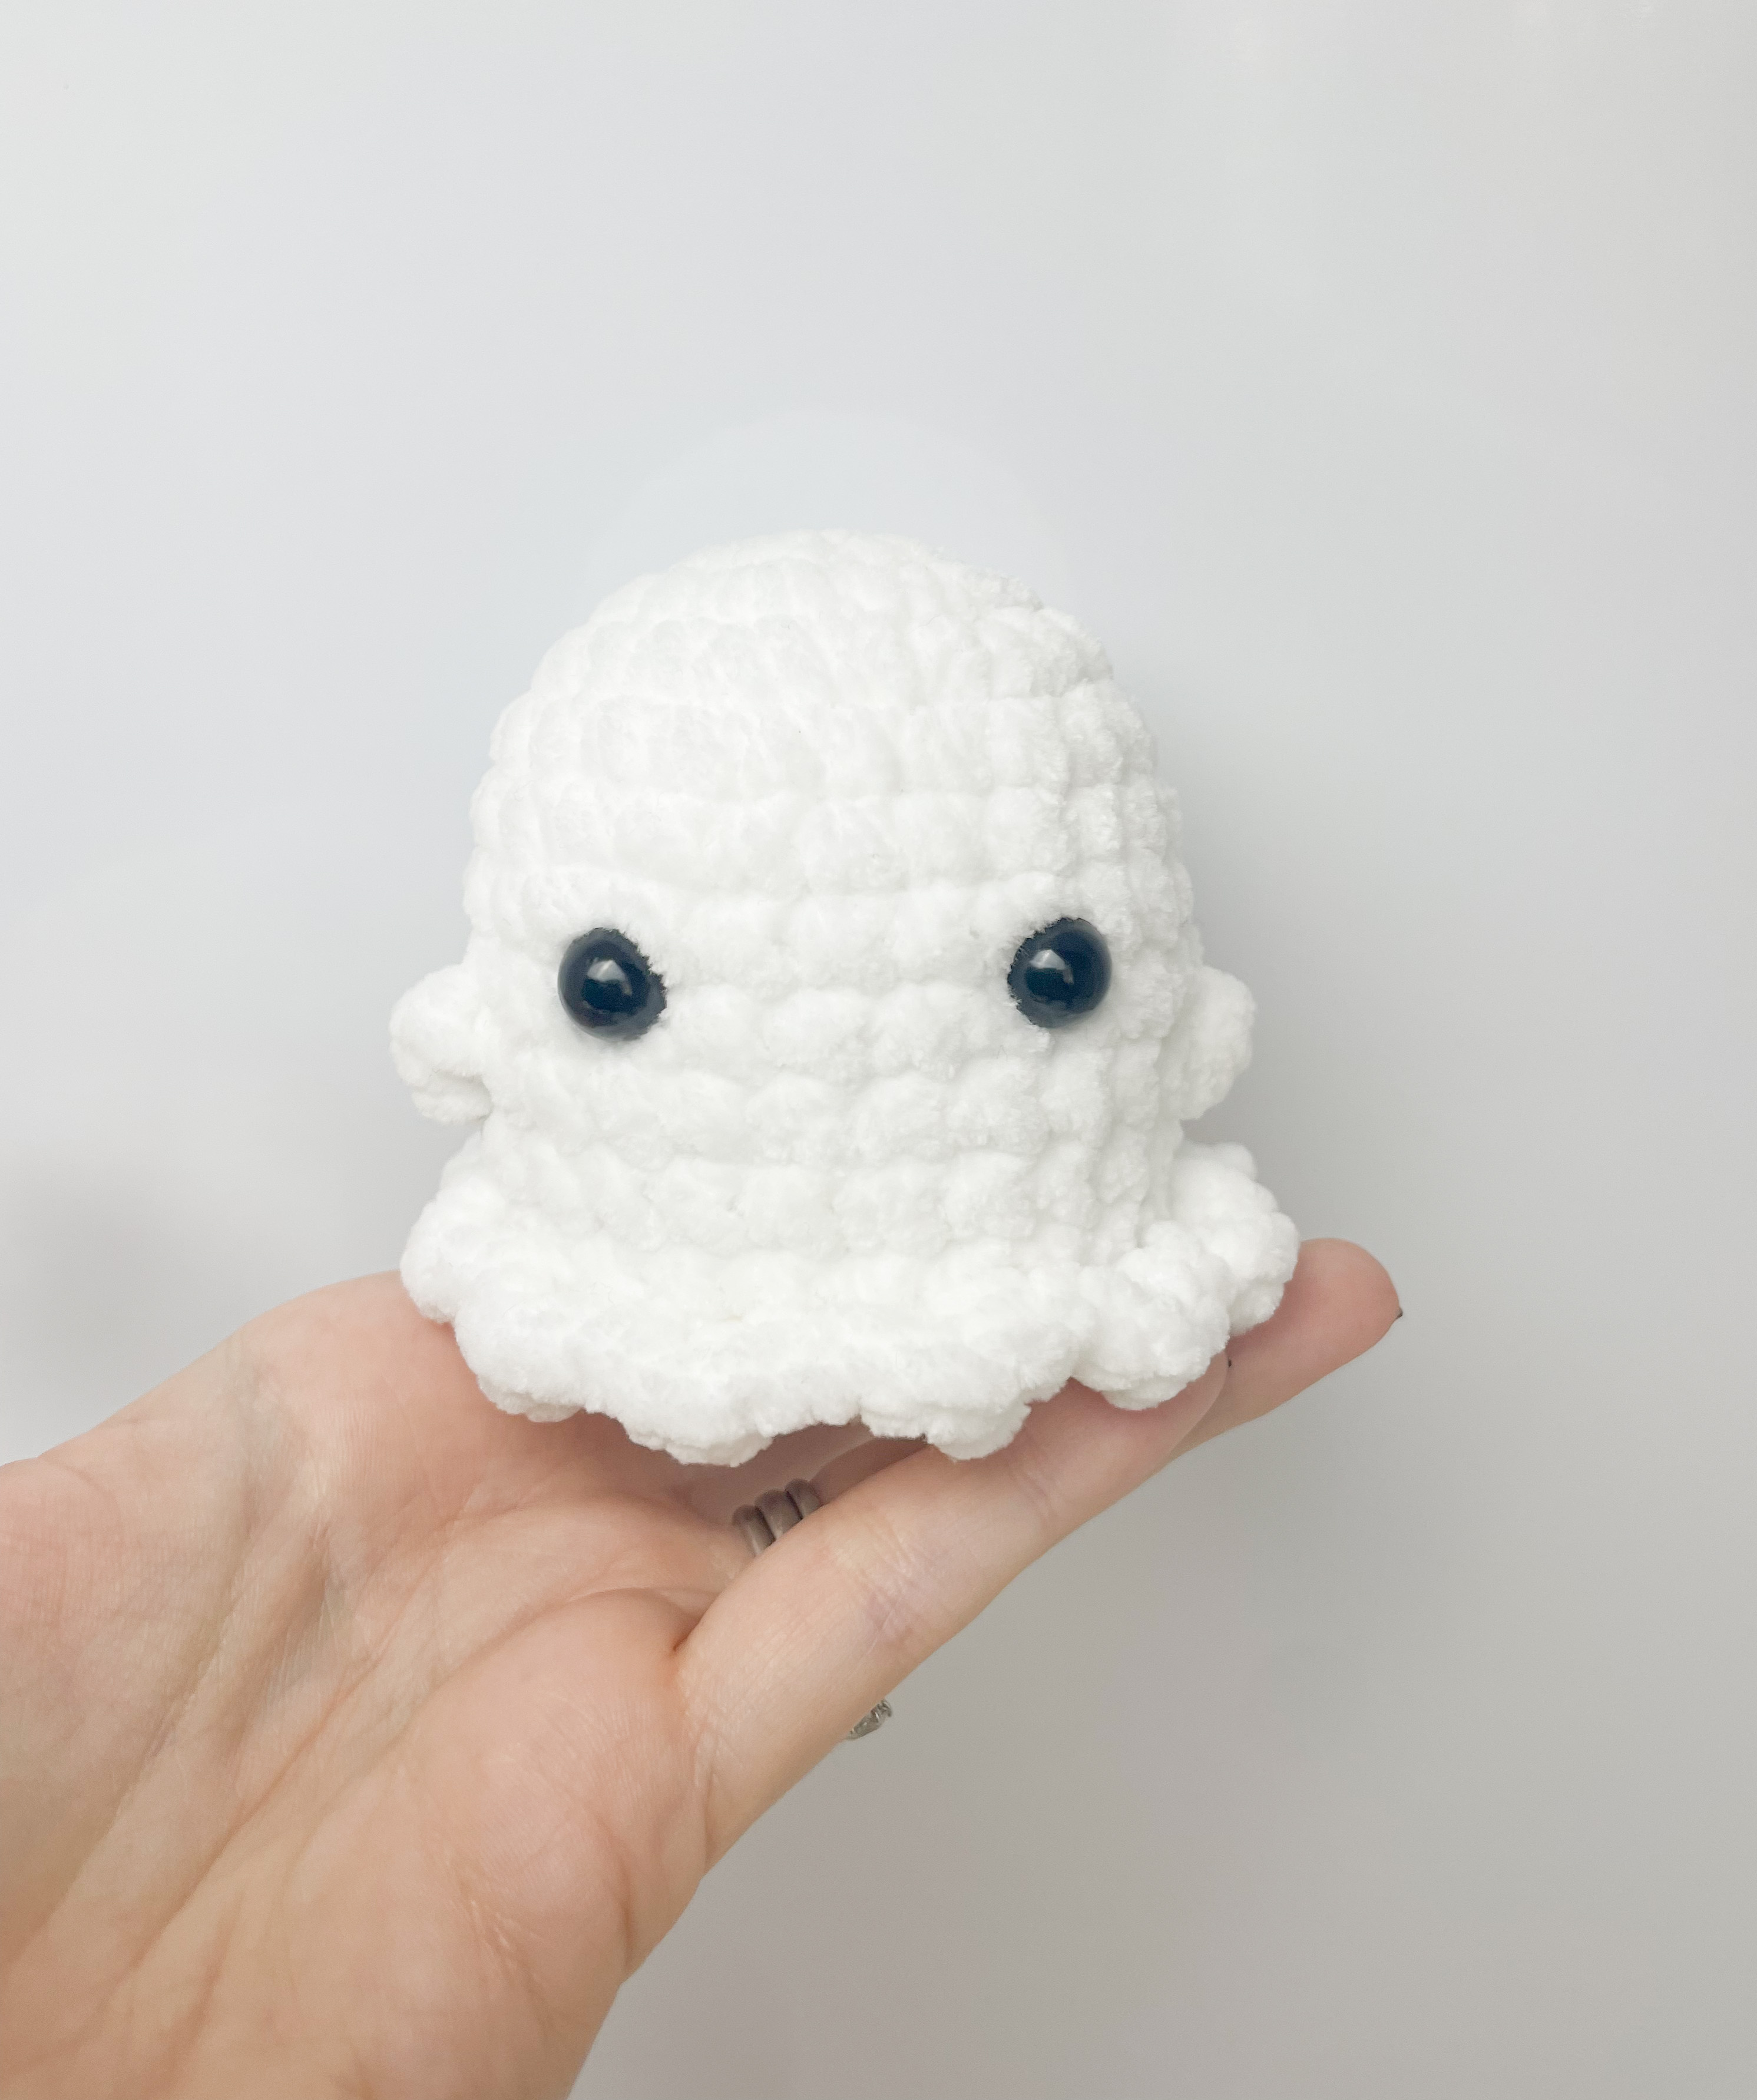
R1: 6 SC in a MR R2: 6 inc (12) R3: (SC, inc) x 6 (18) R4: (2SC, inc) x 6 (24) R5-8: 24SC (4 rounds) R9: 6SC, 1 bobble, 10SC, 1 bobble, 6SC (24)
Eyes: between R7 and R8, 5 sts apart
R10-11: 24SC Mark first and last back loop of R11 with markers R12 (FLO): ([SC, HDC, SC] into 1 st, sl st into next st) x 12 R13: In back loops of R11 (1st and last sts were marked earlier): 24SC R14: (SC, dec) x 8 (16) Stuff R15: 8 dec (8)
*Please note that safety eyes are NOT recommended for children under the age of 3 years.
Abbreviations and stitches
• MR: Magic ring
• St(s): Stitch(es)
• Sl st: Slip Stitch
• Ch: Chain Stitch
• SC: Single crochet
• Inc: Increase (Stitch 2 SC into the stitch)
• Dec: Decrease using the invisible method
• (...) x n: Repeat instructions in brackets n times
**This pattern uses US Crochet Terms**
Pattern
Body/ head
- Light yellow R1: 8 SC in a MR R2: 8 inc (16) R3: (SC, inc) x 8 (24) R4: (3SC, inc) x 6 (30) R5: (4SC, inc) x 6 (36) R6-10: 36 SC (5 rounds of 36) R11: (4SC, dec) x 6 (30) R12: 30SC R13: (3SC, dec) x 6 (24) R14: 24SC R15: (2SC, dec) x 6 (18) Stuff R16: (SC, dec) x 6 (12) R17: 12 SC Move directly on to head
Head
R18: 12 inc (24) R19: (3SC, inc) x 6 (30) R20: (4SC, inc) x 6 (36) R21-24: 36 SC (4 rounds of 36)
Eyes: between R22 and R23, 4 or 5 sts apart
R25: (4SC, dec) x 6 (30) R26: (3SC, dec) x 6 (24) R27: (2SC, dec) x 6 (18) Stuff head and neck R28: (SC, dec) x 6 (12) R29: 6 dec (6) Close and cut the yarn, leaving a tail for sewing. Sew the hole closed.
Wings (make 2)
- Light yellow R1: 4 SC in a MR R2: 4 inc (8) R3: (SC, inc) x 4 (12) R4. 12SC R5: (2SC, inc) x 4 (16) R6: 16 SC R7: (2SC, dec) x 4 (12) R8: (SC, dec) x 4 (8)
Flatten top of wing. SC across top of wing to close. Close and cut the yarn, leaving a tail for sewing.
Feet (make 2)
- Orange/ darker yellow R1 : 6SC in a MR (6) R2 : 6 inc (12) R3: 12 SC R4: (2SC, dec) x 3 (9) R5: (SC, dec) x 3 (6) Fold flat, SC along top to close.
Close and cut the yarn, leaving a long tail for sewing.
Bill
- Orange/ darker yellow
Ch 5 R1: SC in 2nd ch from hook (mark this st), 2SC, 3SC in last ch Underside: 2SC, inc, sl st into 1st marked SC (10) The next round starts in the st after the sl st
R2: 10 SC R3: (4SC, inc) x 2 (12) R4: 12 SC Sl st to close. Cut the yarn, leaving a long tail for sewing.
Assembly
- Sew the wings at the side of body, one round below the neck
- Sew the feet under the body, starting at R3 or R4 (roughly in line with the eyes, facing outwards slightly)
- Sew the bill on to the front of the face, just under the eyes (as close to the eyes as possible)
Tail
Use either darker or lighter colour
Attach the yarn at the back of the duck where the tail should go. Ch 8, sl st back into a st right next to the starting st on the duck . Repeat for as many loops as you prefer (the duck pictured has 3 tail loops). Close and cut the yarn. Tie the tails together and use the yarn tails to pull the knot into the body.
Hair
Use either lighter or darker colour Attach the yarn at the top of the head. Ch 8, sl st back into a st right next to the starting st. Repeat for as many loops as you prefer (the duck pictured has 2 hair loops) Tie the tails together and use the yarn tails to pull the knot into the head
Finishing Details
- Embroider whites of eyes using white yarn - Embroider eyebrows using black yarn
This is a free pattern to crochet this super cute watermelon bag. It can be made in any size, and it's also no-sew! The only sewing is in weaving in the ends, and embroidering the seeds.
- Small amount of medium weight black yarn for embroidering seeds OR black beads and thread
Other Items used
- US G/4.25mm Crochet Hook (or a hook to match the yarn you're using)
- Yarn needle
- Scissors
- Stitch markers
Abbreviations and Stitches
• MR: Magic ring • St(s): Stitch(es) • SC: Single crochet
• Ch: Chain Stitch • Sl St: Slip Stitch
• Inc: Increase (Stitch 2 SC into the stitch) • (...) x n: Repeat instructions in brackets n times **This pattern uses US Crochet Terms**
Pattern Notes
- The ch 1 at the beginning of each row counts as a stitch - This means the first increase of each row will be in the 3rd stitch from the hook - Pattern can be increased to any size, following the same progression of stitches. The pattern progression is as below:
Pattern
We will make two semi circles and join them together
Semi circle - make 2
Remember:
- The ch 1 at the beginning of each row counts as a stitch - This means the first increase of each row will be in the 3rd stitch from the hook
(I did 11 rows of pink. However, you can do as many as you like, following the same progression)
Colour change to white
(If you did more rows, just follow on the progression to do 2 rows of white) R12: Ch 1, turn, inc, 11SC, inc, 11SC, inc, 10SC (39) R13: Ch 1, turn, inc, 12SC, inc, 12SC, inc, 11SC (42)
Colour change to green (If you did more rows, just follow on the progression to do one row of green) R14: Ch 1, turn, inc, 13SC, inc, 13SC, inc, 12SC (45)
(If you did more rows, just do one SC in BLO of each stitch of previous row) R15: Ch 1, turn, 44SC in BLO (45)
For the 1st semi circle only: close and cut yarn after your last row
For the 2nd semi circle only: DO NOT close or cut yarn. We are going to join the semi circles together.
Join the semi circles
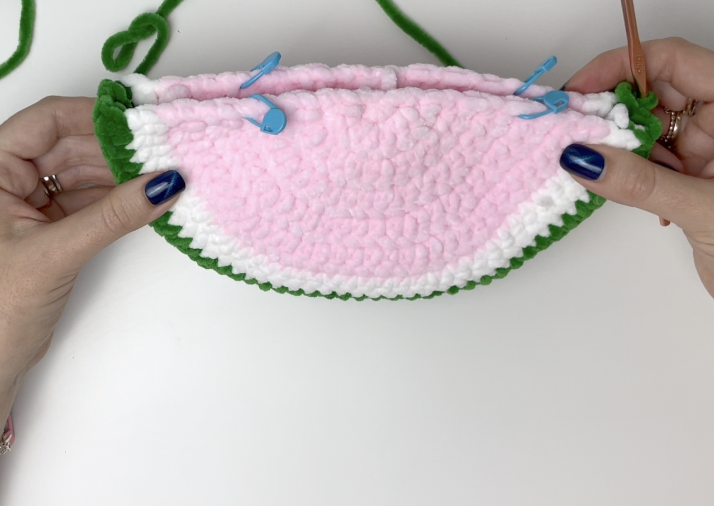
Place the semi circles RIGHT SIDES TOGETHER, and sl st across both sides all the way across
Hint: You can determine the right side, because the last row of BLO SC curves the semi circle backwards as per the image below:
NB: The bag is now inside out. Turn it the right way around again. The seam from the slip stitches should be on the inside.
Straps
Using stitch markers, mark where you want the straps to start and end (2 stitch markers per side)
Continue crocheting with green; we are now going to work in rounds to do the straps
R1: Ch 1, SC into the end of each row until you reach the first stitch marker Ch enough stitches to make the strap the length you want (I do 25 ch)
SC into the stitch marked by the next stitch marker SC into the end of each row around, until the next stitch marker. Chain the same amount as the first strap SC into the next stitch marker and the rest of the way around the bag
Sl st to join to the first SC of the round
R2: Ch 1, SC into each st from R1 (including all ch sts). Sl st to join to first SC of round
Close and cut the yarn. Weave in all ends.
Seeds
Use a long length of medium weight black yarn to embroider the seeds, or sew the black beads on to the bag with thread
• Dec: Decrease using the invisible method • DC: Double Crochet • HDC: Half Double Crochet
• TR: Treble Crochet • Inc: Increase (Stitch 2 SC into the stitch) • (...) x n: Repeat instructions in brackets n times **This pattern uses US Crochet Terms**
Pattern
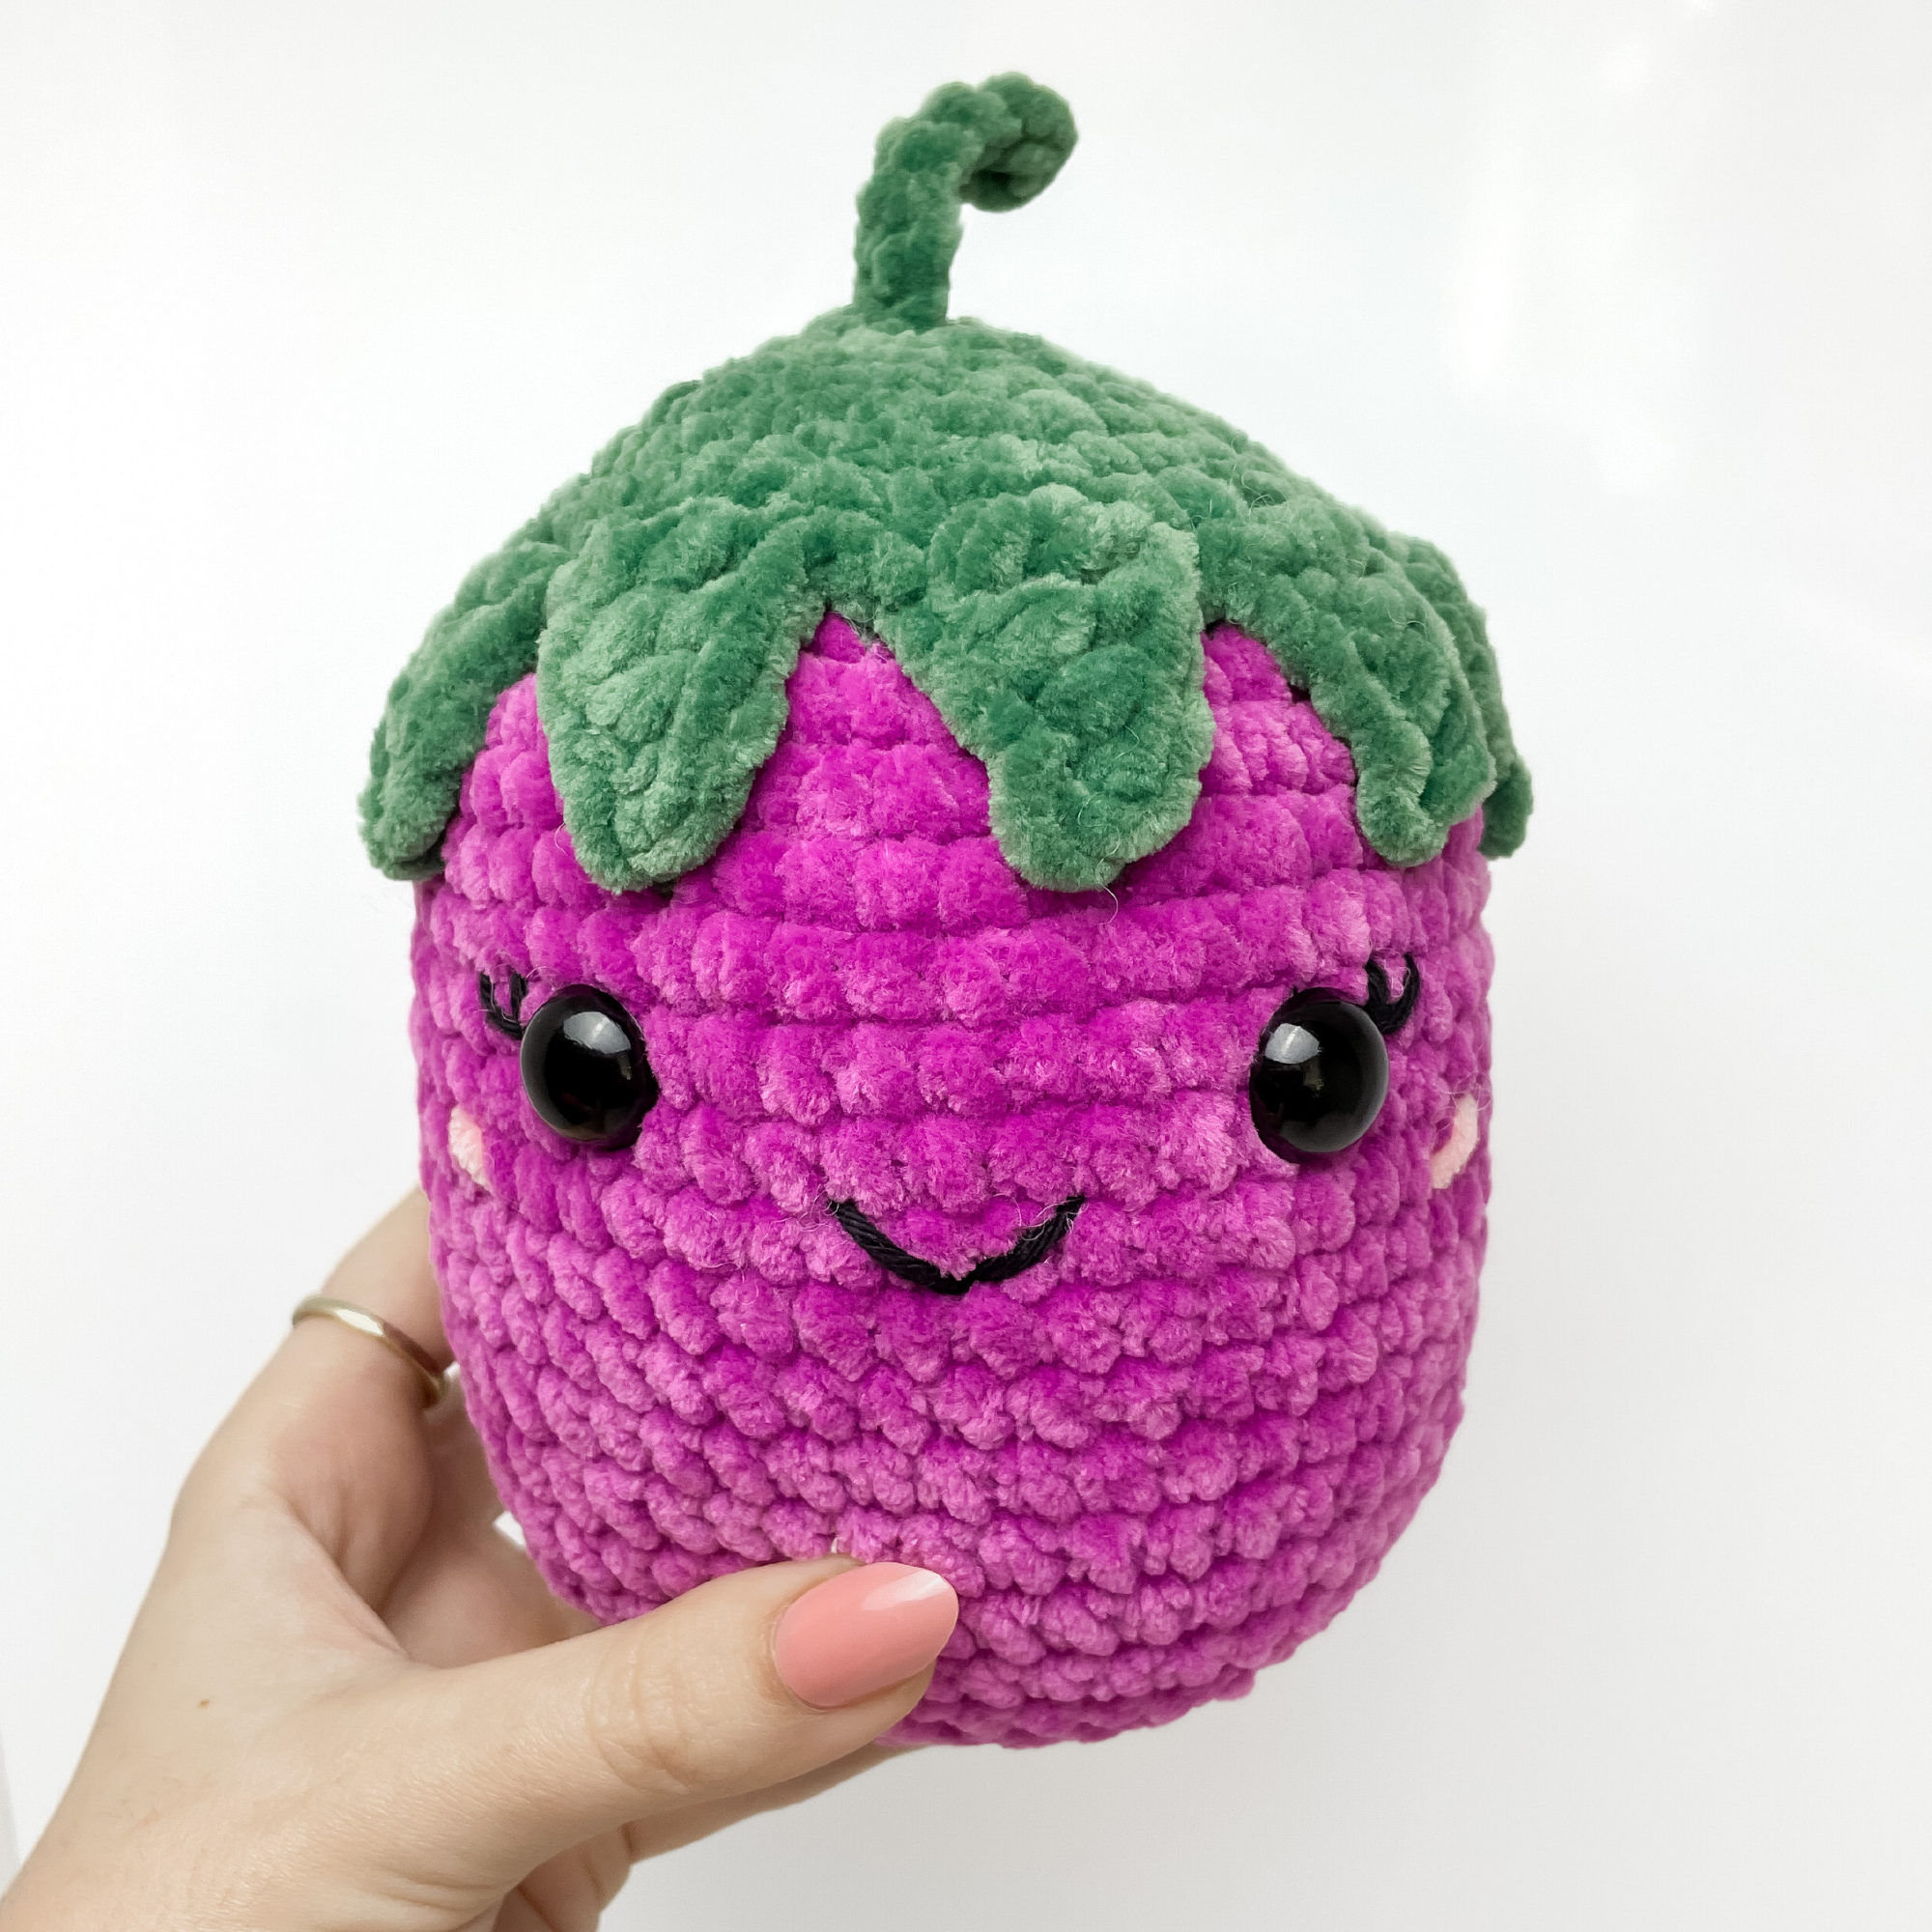
Using purple yarn:
R1: 6 SC in a MR R2: 6 inc (12) R3: (SC, inc) x 6 (18) R4: (2SC, inc) x 6 (24) R5: (3SC, inc) x 6 (30) R6: (4SC, inc) x 6 (36) R7: (5SC, inc) x 6 (42) R8: (6SC, inc) x 6 (48) R9-20: 48SC (12 rounds of 48)
Place safety eyes between R12 and R13, about 10 sts apart
R21: (4SC, dec) x 8 (40) R22: (3SC, dec) x 8 (32) R23: (2SC, dec) x 8 (24)
Start to stuff the piece R24: (SC, dec) x 8 (16) Finish stuffing R25: 8 dec (8) Close and cut the yarn, leaving a tail for sewing. Sew the hole closed.
Leaves
Using green yarn:
R1: 6 SC in a MR R2: 6 inc (12) R3: (SC, inc) x 6 (18) R4: (2SC, inc) x 6 (24) R5: (3SC, inc) x 6 (30) R6: (4SC, inc) x 6 (36) R7: (8SC, inc) x 4 (40)
R8: (SC, ch 5, SC in 2nd ch from hook, HDC, DC, TR in last ch, sk 2 st on circle, SC in next st) x 10 (10 leaves) Sl st to close. Cut the yarn, leaving a long tail for sewing.
Sew on to the top of the eggplant.
(I only sew on the tips and bases of the leaves)
Stem
Attach yarn at the top of the eggplant and leaves
Ch 6. Starting in 2nd ch from hook: 5SC back along ch
Close and cut yarn. Tie yarn tails together and pull knot into the piece
Finishing details
Embroider the cheeks using pink yarn
Embroider the eyelashes and mouth using black yarn
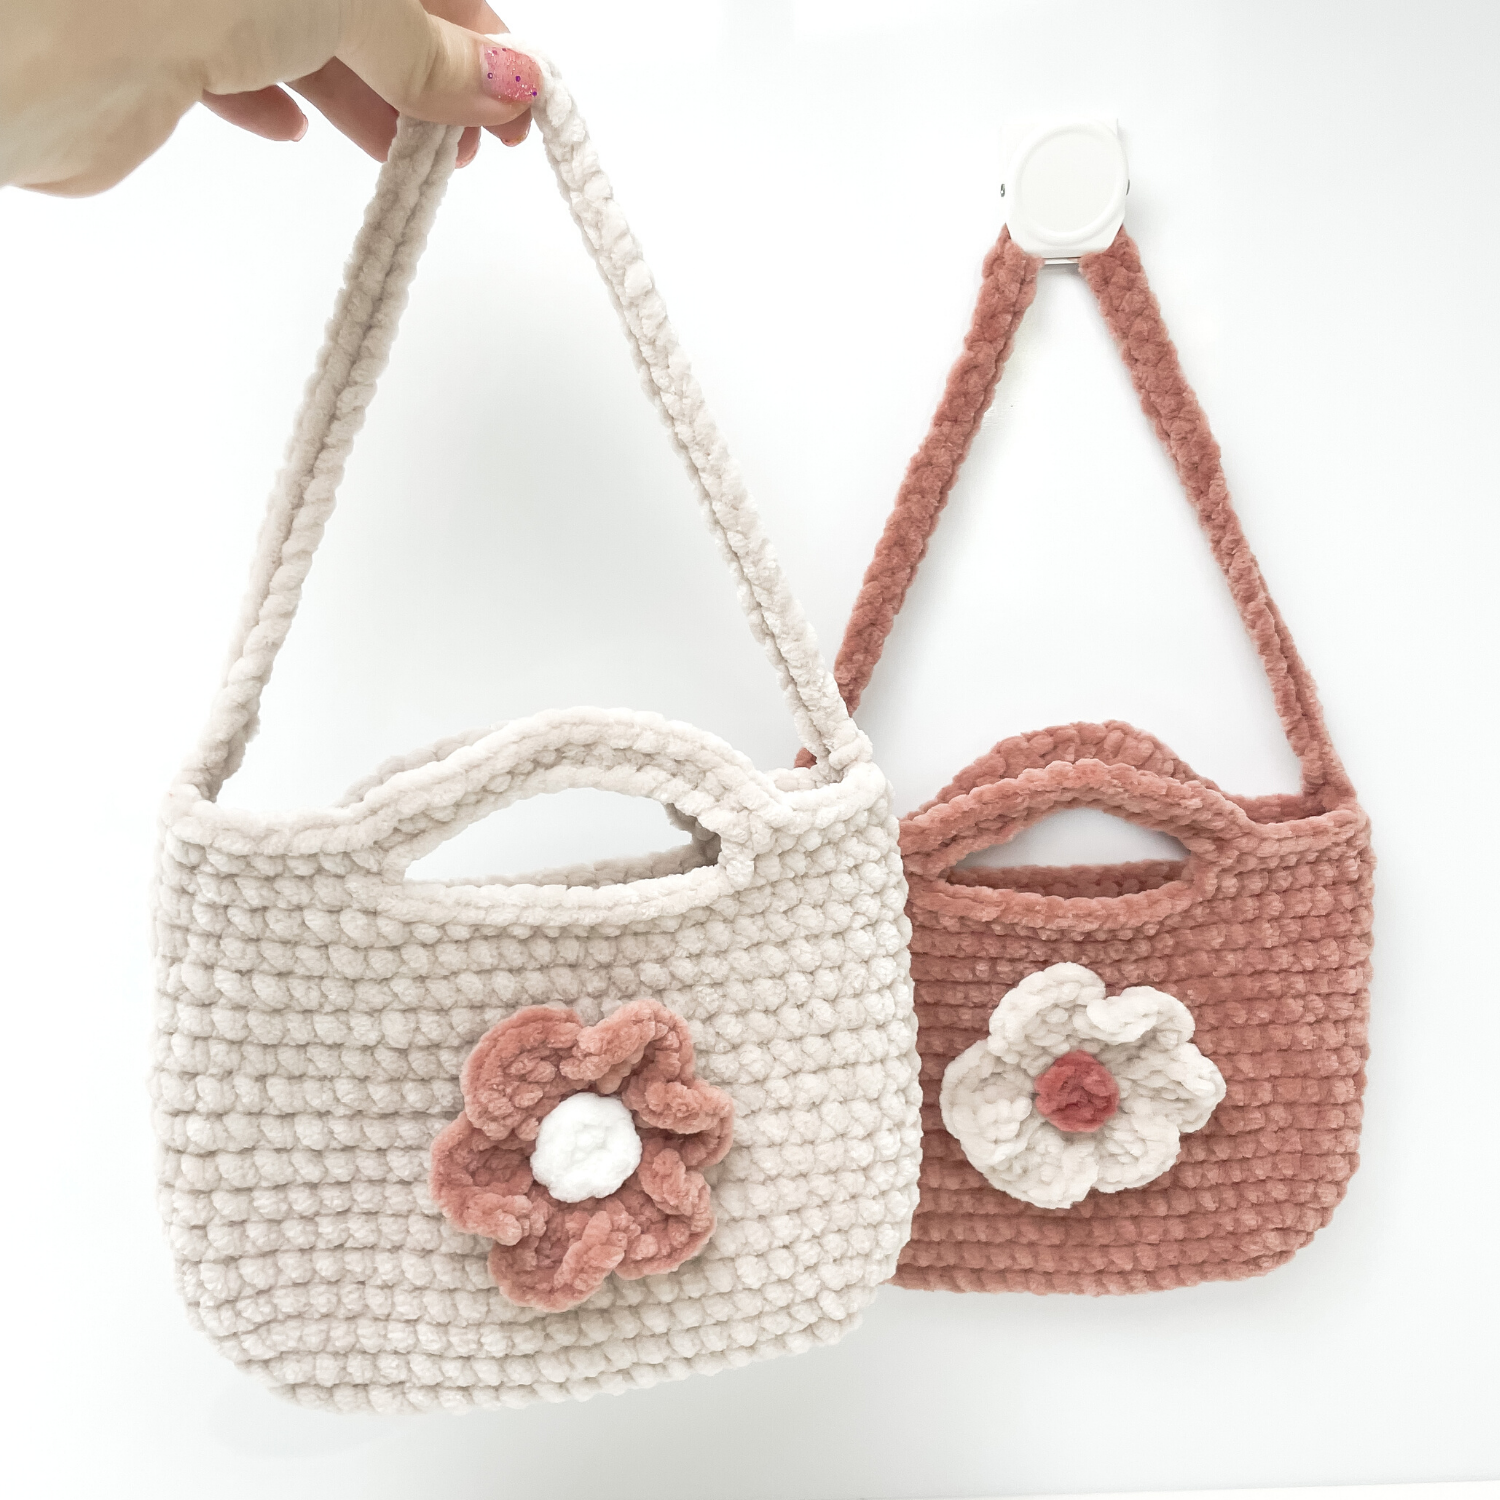
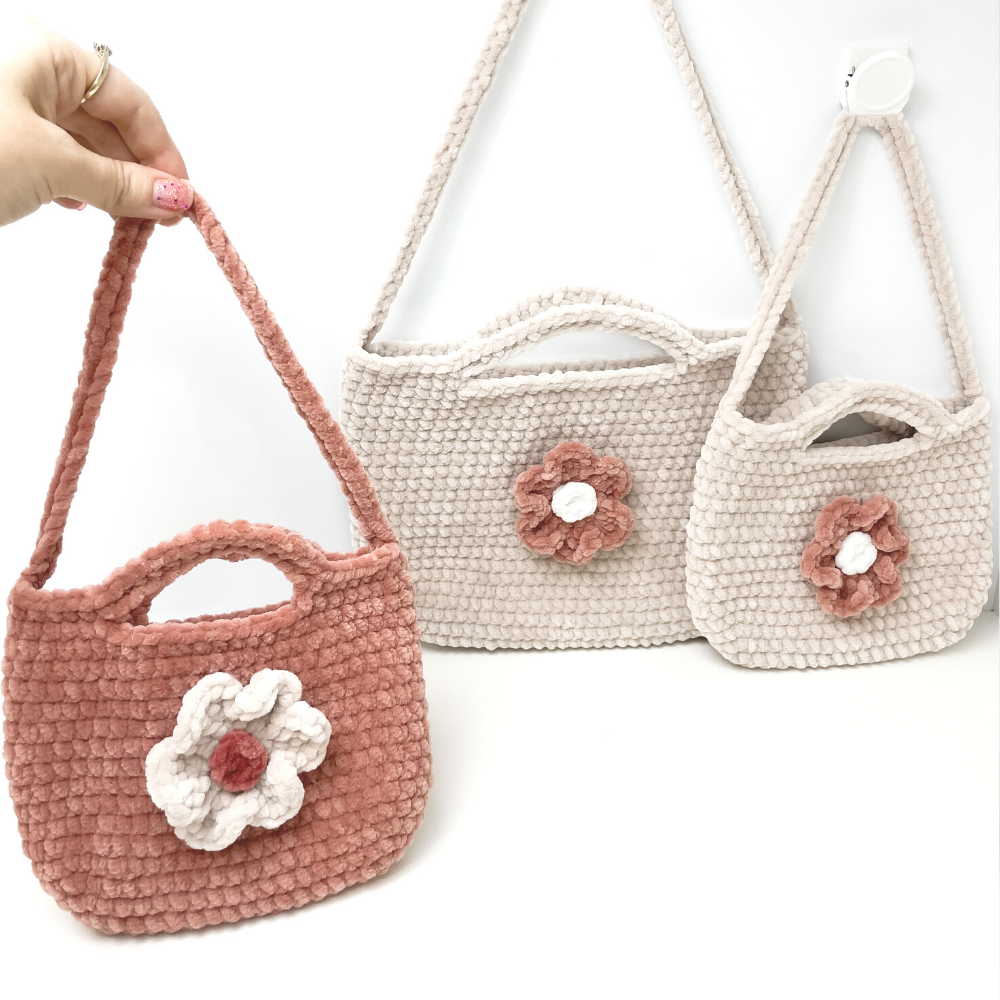
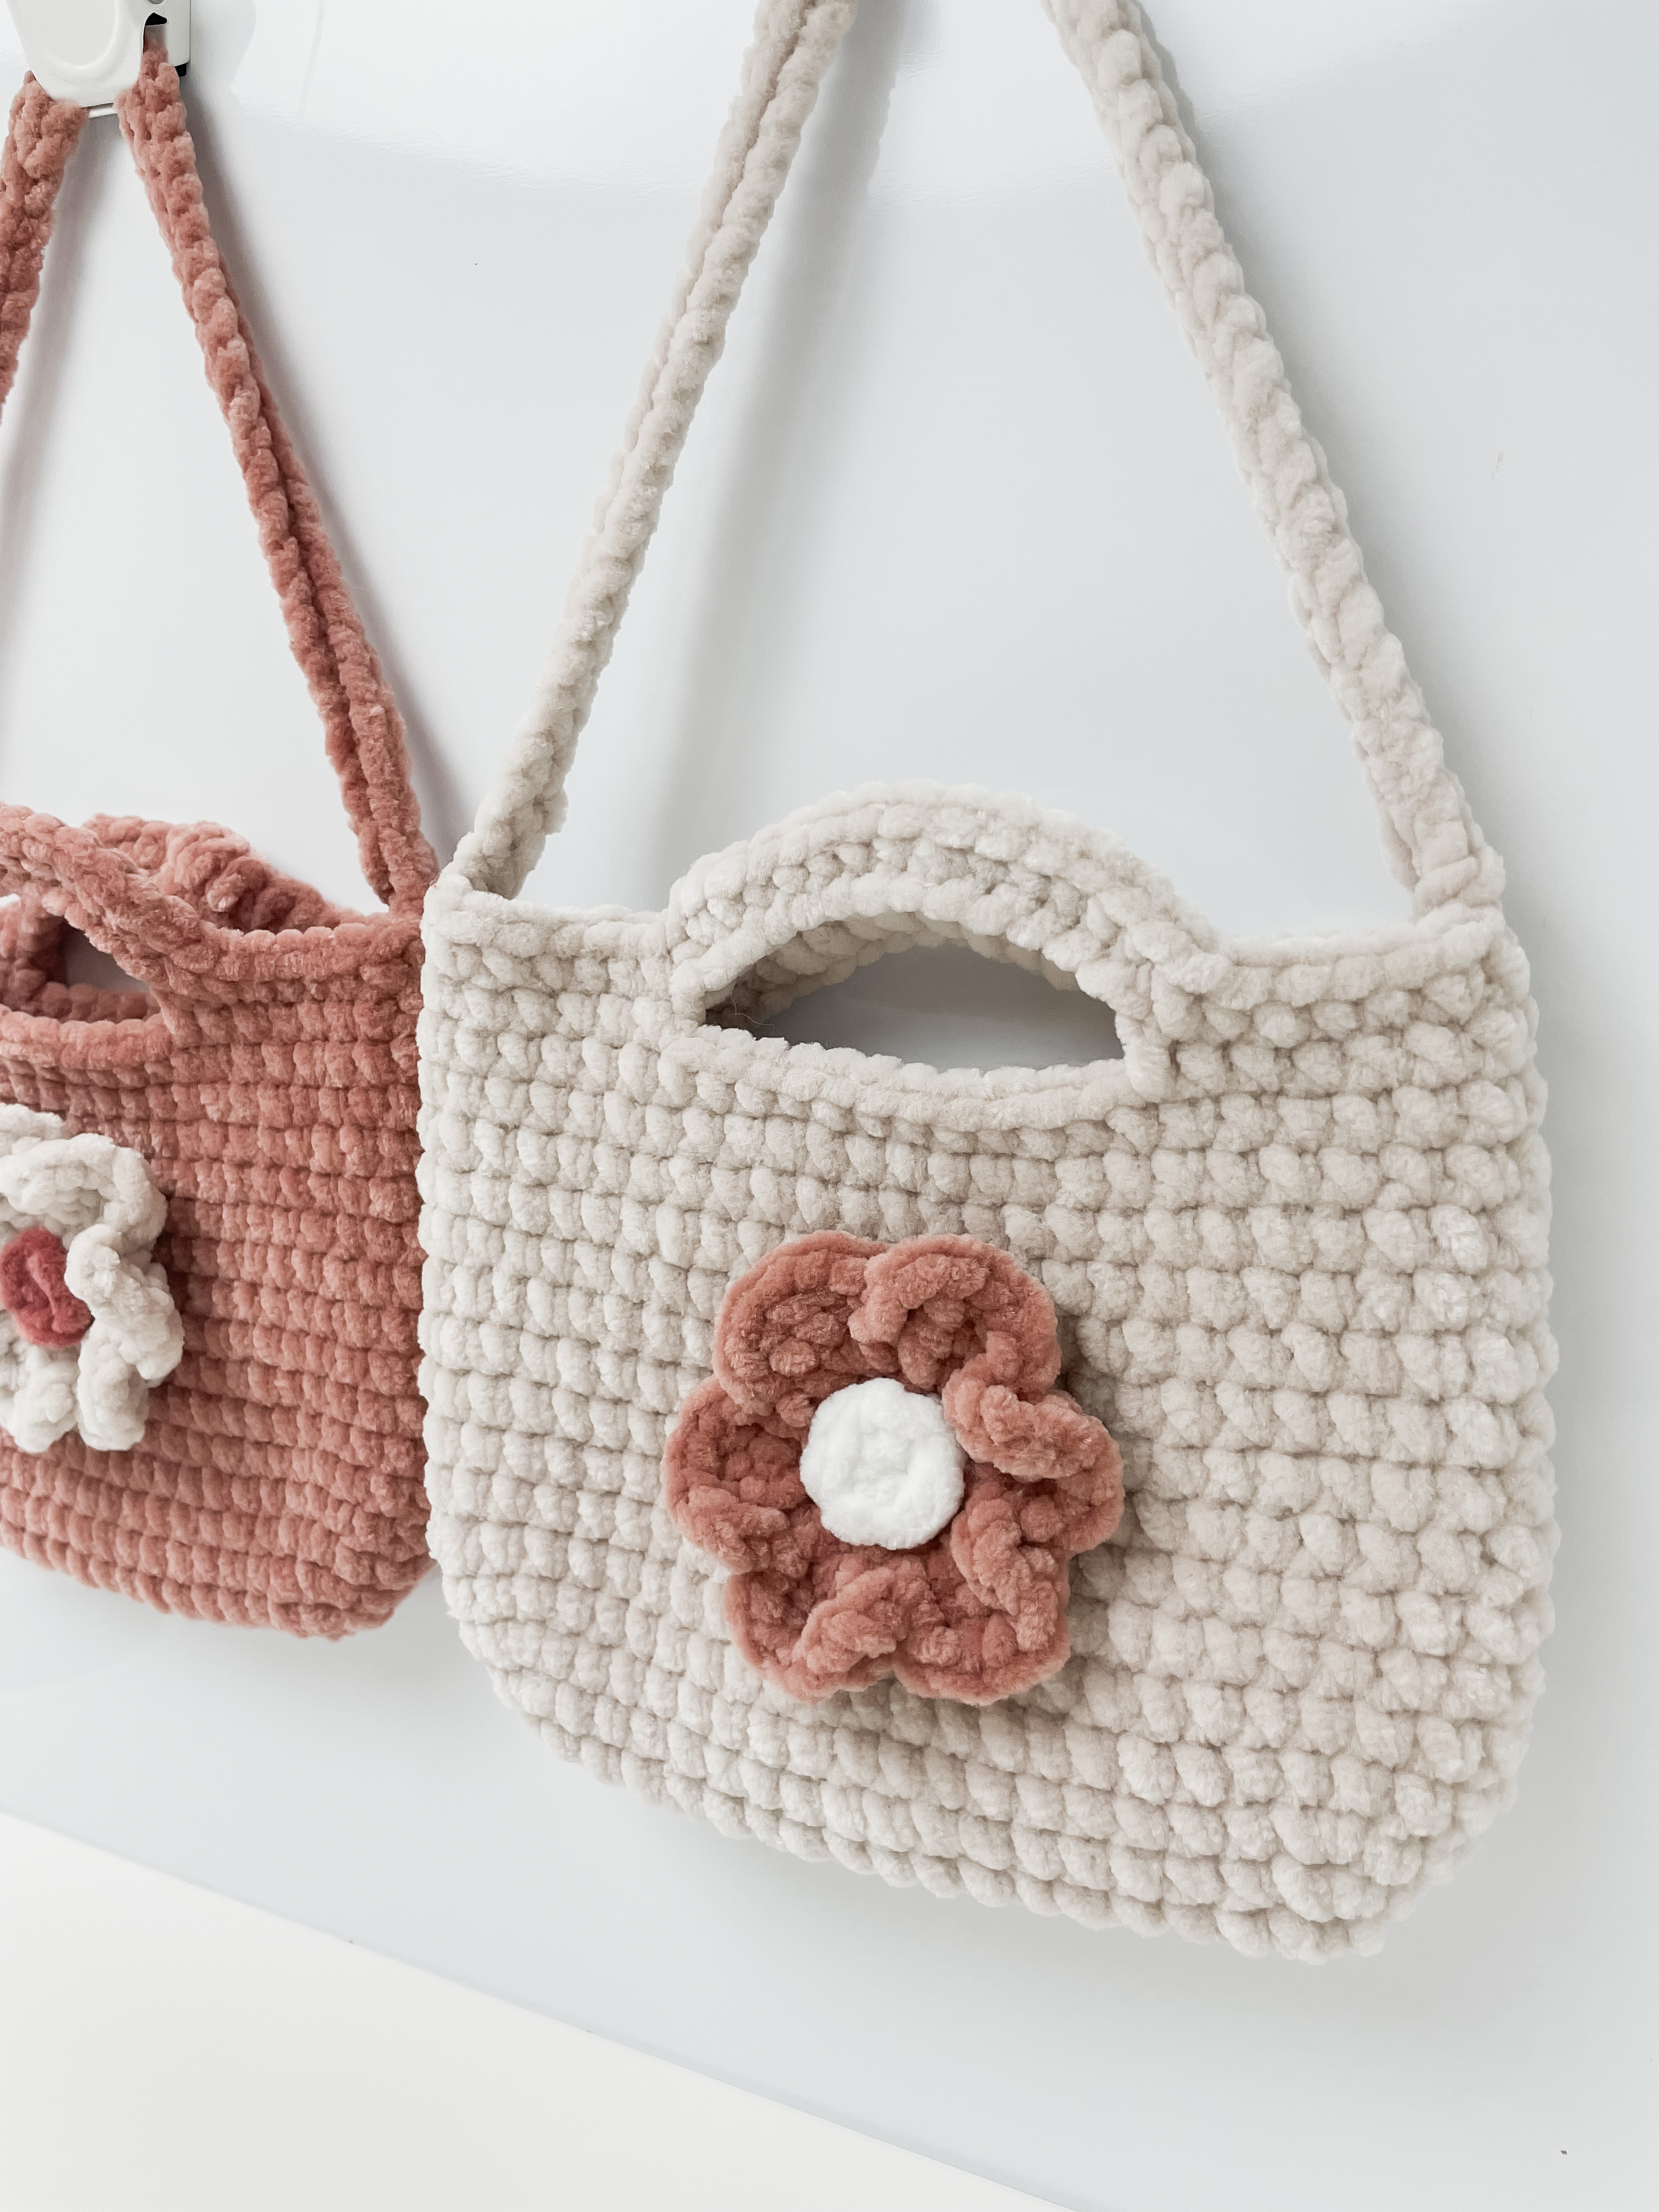
This is a crochet pattern to make this adorable plush bag - a larger version of the original bag. The bag itself is no-sew, as it' s crocheted all in one piece! The optional flower has a small amount of sewing to attach to the bag.
This bag (using Hobbii Baby Snuggle) measures at about 30cm x 30cm (12 inch x 12 inch) including the small handles. If you use thicker yarn and a bigger hook, it would be larger.
Yarn used
Hobbii Baby Snuggle
- Soft sand - Powder pink
- White
Other Items used
- US G/4.25mm Crochet Hook (or a hook to match the yarn you're using)
- Yarn needle - Stitch markers -optional
Abbreviations and stitches
• MR: Magic ring • St(s): Stitch(es) • SC: Single crochet
• Ch: Chain Stitch • Sl St: Slip Stitch • Sk: Skip a stitch • DC: Double Crochet • HDC: Half Double Crochet • Inc: Increase (Stitch 2 SC into the stitch) • (...) x n: Repeat instructions in brackets n times **This pattern uses US Crochet Terms**
Pattern
Ch 27 R1: In 2nd ch from hook: 1 SC (mark this st), 24 SC back along ch 3 SC in last ch Underside: 24SC, inc, sl st to 1st SC (mark this st - it’s the end of the round) (54) (Next round starts after sl st)
R2: (24 SC, 3 inc) x 2 (60) R3: (24 SC, [SC, inc] x 3) X 2 (66) R4: (24 SC, [2SC, inc] x 3) x 2 (72) R5-22: 72 SC (18 rounds of 72) (Add more rounds here if you’d like the bag taller)
Make one or two SC if necessary (or remove one or two SC), to get to the side of bag
Don't close. Continue straight to short straps.
Short straps
R23: 10SC, ch 20, sk 16, 20SC, ch 20, sk 16, 10SC (80) R24: 10SC, 20SC in ch, 20SC, 20SC in ch, 10SC (80)
Make one or two SC if necessary (or remove one or two SC), to get to the side of bag.
Don't close. Continue straight to long strap.
Long strap
Ch 70 (or more) for long strap Sl st to opposite side of bag, sl st into next st on bag to secure Sl st back along ch Sl st into next st on bag Close and weave in ends
Flower (optional)
Flower base and petals
R1: Ch 3, sl st to 1st ch to form a ring R2: Into centre of ring: Ch 2 (counts as 1st HDC), 11 HDC, sl st to top of ch 2 (12 HDC) R3: Ch 2, 3 DC in same st, ch 2, sl st in next st, (ch 2, 3 DC in next st, ch 2, sl st in next st) x 11, Sl st to bottom of first st made Close and cut the yarn, leaving a tail for sewing on to the bag. Bring the ending tail around to the back of the flower and tie together with starting tail.
Flower centre
Using a different colour from the base and petals:
R1: 6 SC in a MR, sl st back to 1st SC Close the cut the yarn, leaving a tail for sewing on to the flower base.
Sew on to the flower base
Sew the flower on to the front of the bag, using the tails from the flower base.
This is a crochet pattern to make this adorable plush bag. The bag itself is no-sew, as it' s crocheted all in one piece! The optional flower has a small amount of sewing to attach to the bag.
This bag (using Hobbii Baby Snuggle) measures at about 20cm x 20cm (8inch x 8 inch) including the small handles. If you use thicker yarn and a bigger hook, it would be larger.
- US G/4.25mm Crochet Hook (or a hook to match the yarn you're using)
- Yarn needle - Stitch markers -optional
Abbreviations and stitches
• MR: Magic ring • St(s): Stitch(es) • SC: Single crochet
• Ch: Chain Stitch • Sl St: Slip Stitch • Sk: Skip a stitch • DC: Double Crochet • HDC: Half Double Crochet • Inc: Increase (Stitch 2 SC into the stitch) • (...) x n: Repeat instructions in brackets n times **This pattern uses US Crochet Terms**
Pattern
R1:
Ch 19 In 2nd ch from hook: 1 SC (mark this st), 16 SC back along ch 3 SC in last ch Underside: 16SC, inc, sl st to 1st SC (mark this st - it’s the end of the round) (38) (Next round starts in stitch after marked 1st stitch of R1)
R2: (16 SC, 3 inc) x 2 (44) R3: (16 SC, [SC, inc] x 3) X 2 (50) R4-15: 50 SC (12 rounds of 50) Make one or two SC if necessary, to get to the side of bag.
Don't close or cut yarn. Continue directly to R16 where we will crochet the short straps
Short straps
R16: 7SC, ch 14, sk 11,14SC, ch 14, sk 11, 7SC (56) R17: 7SC, 14SC in ch, 14SC, 14SC in ch, 7SC (56) Make one or two SC if necessary, to get to the side of bag
Don't close or cut yarn. Continue directly to long strap
Long strap
Ch 50 (or more) Sl st to opposite side of bag, sl st into next st on bag to secure Sl st back along ch Sl st into next st on bag Close and weave in ends
Flower (optional)
Flower base and petals
R1: Ch 3, sl st to 1st ch to form a ring R2: Into centre of ring: Ch 2 (counts as 1st HDC), 11 HDC, sl st to top of ch 2 (12 HDC) R3: Ch 2, 3 DC in same st, ch 2, sl st in next st, (ch 2, 3 DC in next st, ch 2, sl st in next st) x 11, Sl st to bottom of first st made Close and cut the yarn, leaving a tail for sewing on to the bag. Bring the ending tail around to the back of the flower and tie together with starting tail.
Flower centre
Using a different colour from the base and petals:
R1: 6 SC in a MR, sl st back to 1st SC Close the cut the yarn, leaving a tail for sewing on to the flower base.
Sew on to the flower base
Sew the flower on to the front of the bag, using the tails from the flower base.
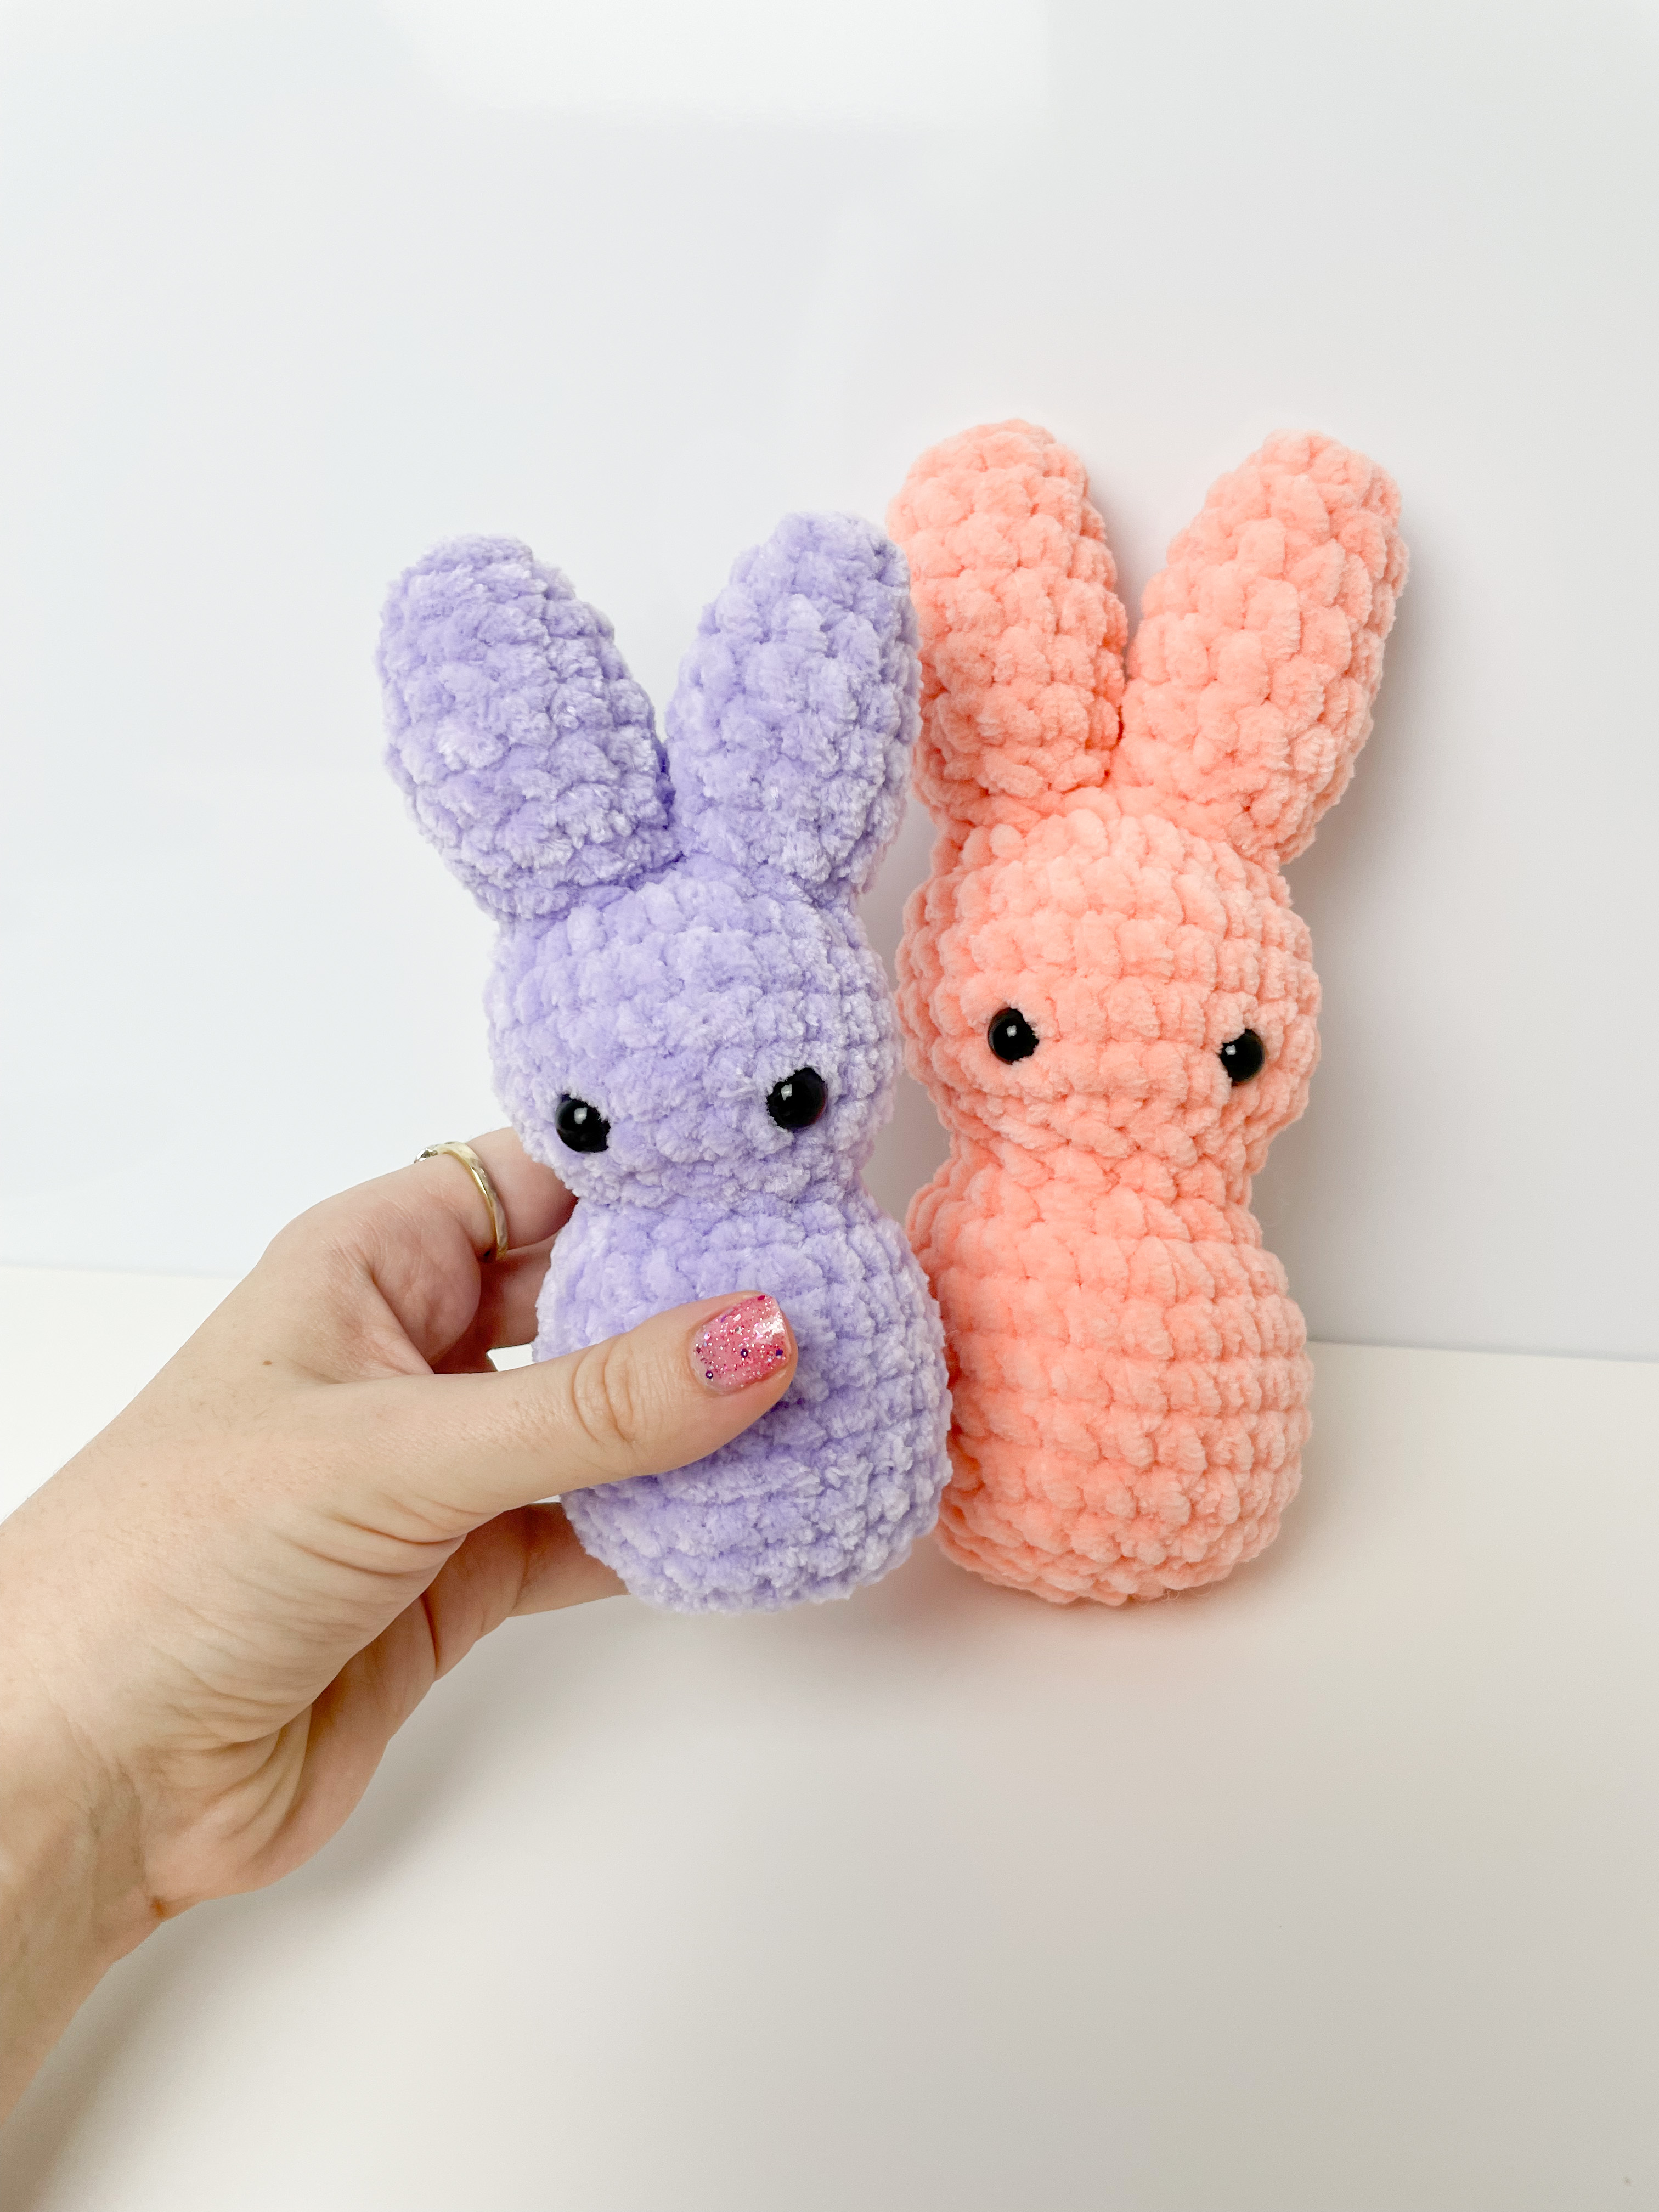
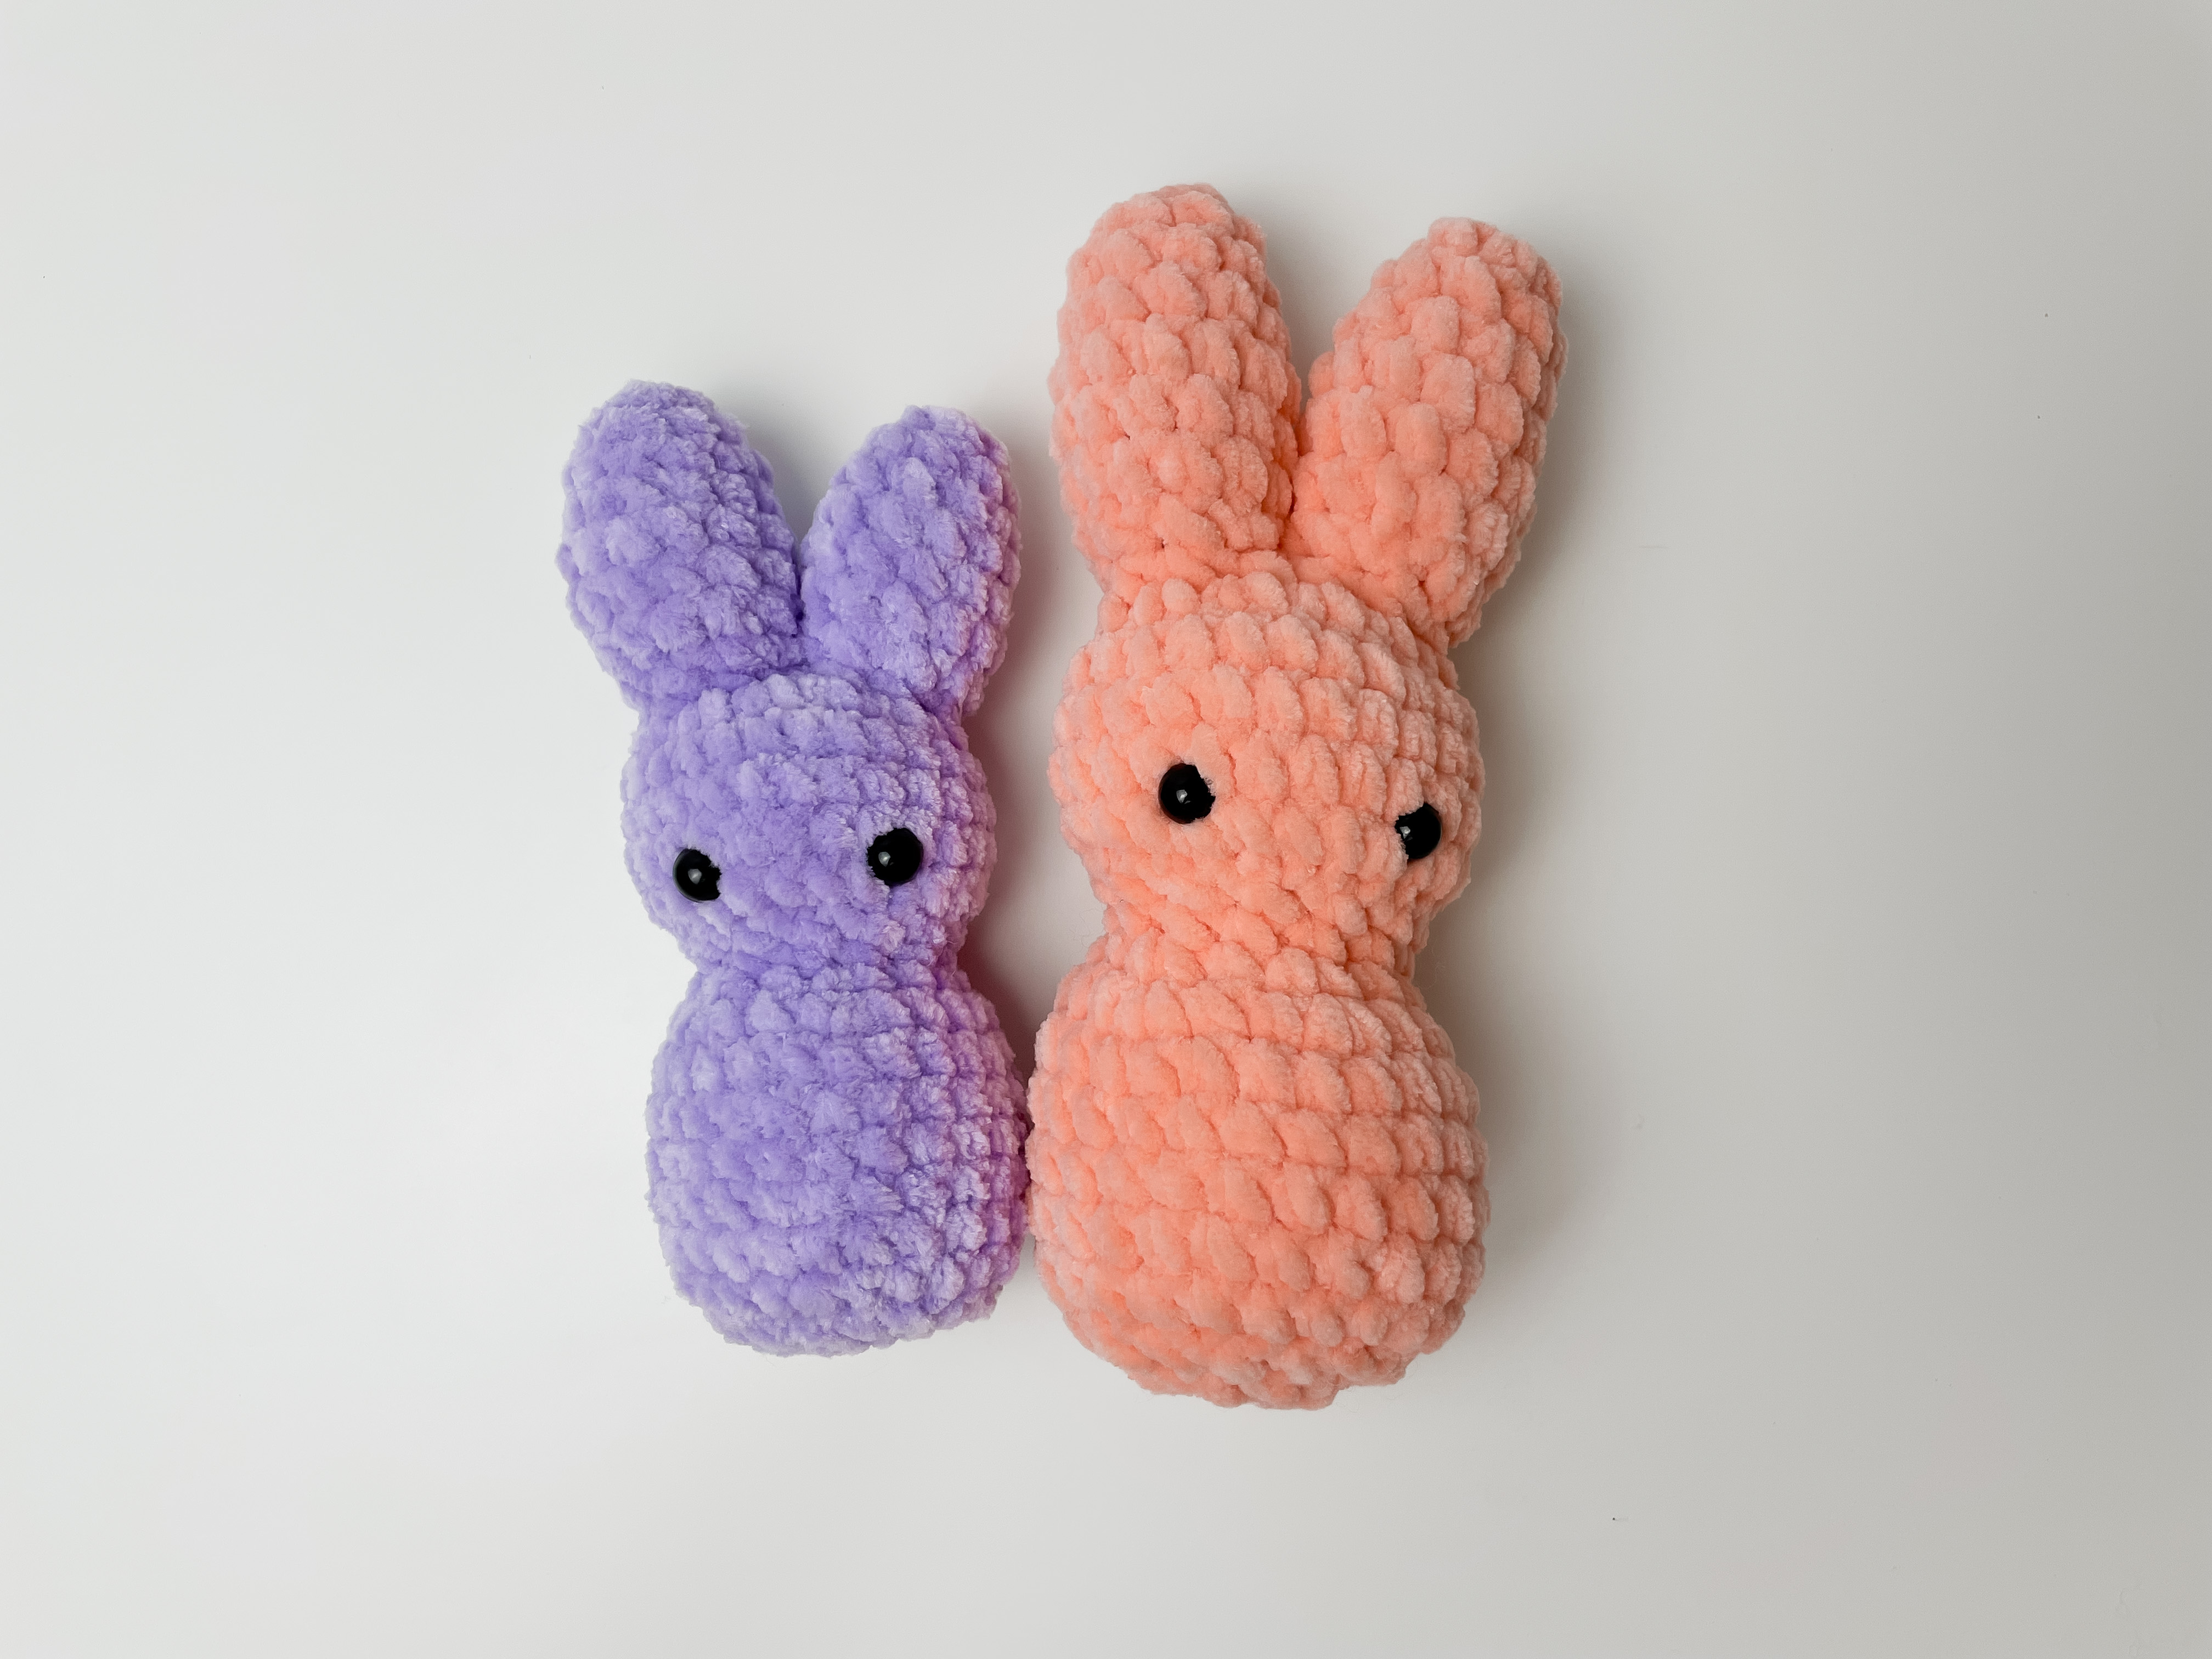
*Please note that safety eyes are NOT recommended for children under the age of 3 years.
Abbreviations and stitches
• MR: Magic ring
• St(s): Stitch(es)
• SC: Single crochet
• Inc: Increase (Stitch 2 SC into the stitch)
• Sl St: Slip Stitch
• (...) x n: Repeat instructions in brackets n times
**This pattern uses US Crochet Terms**
Pattern
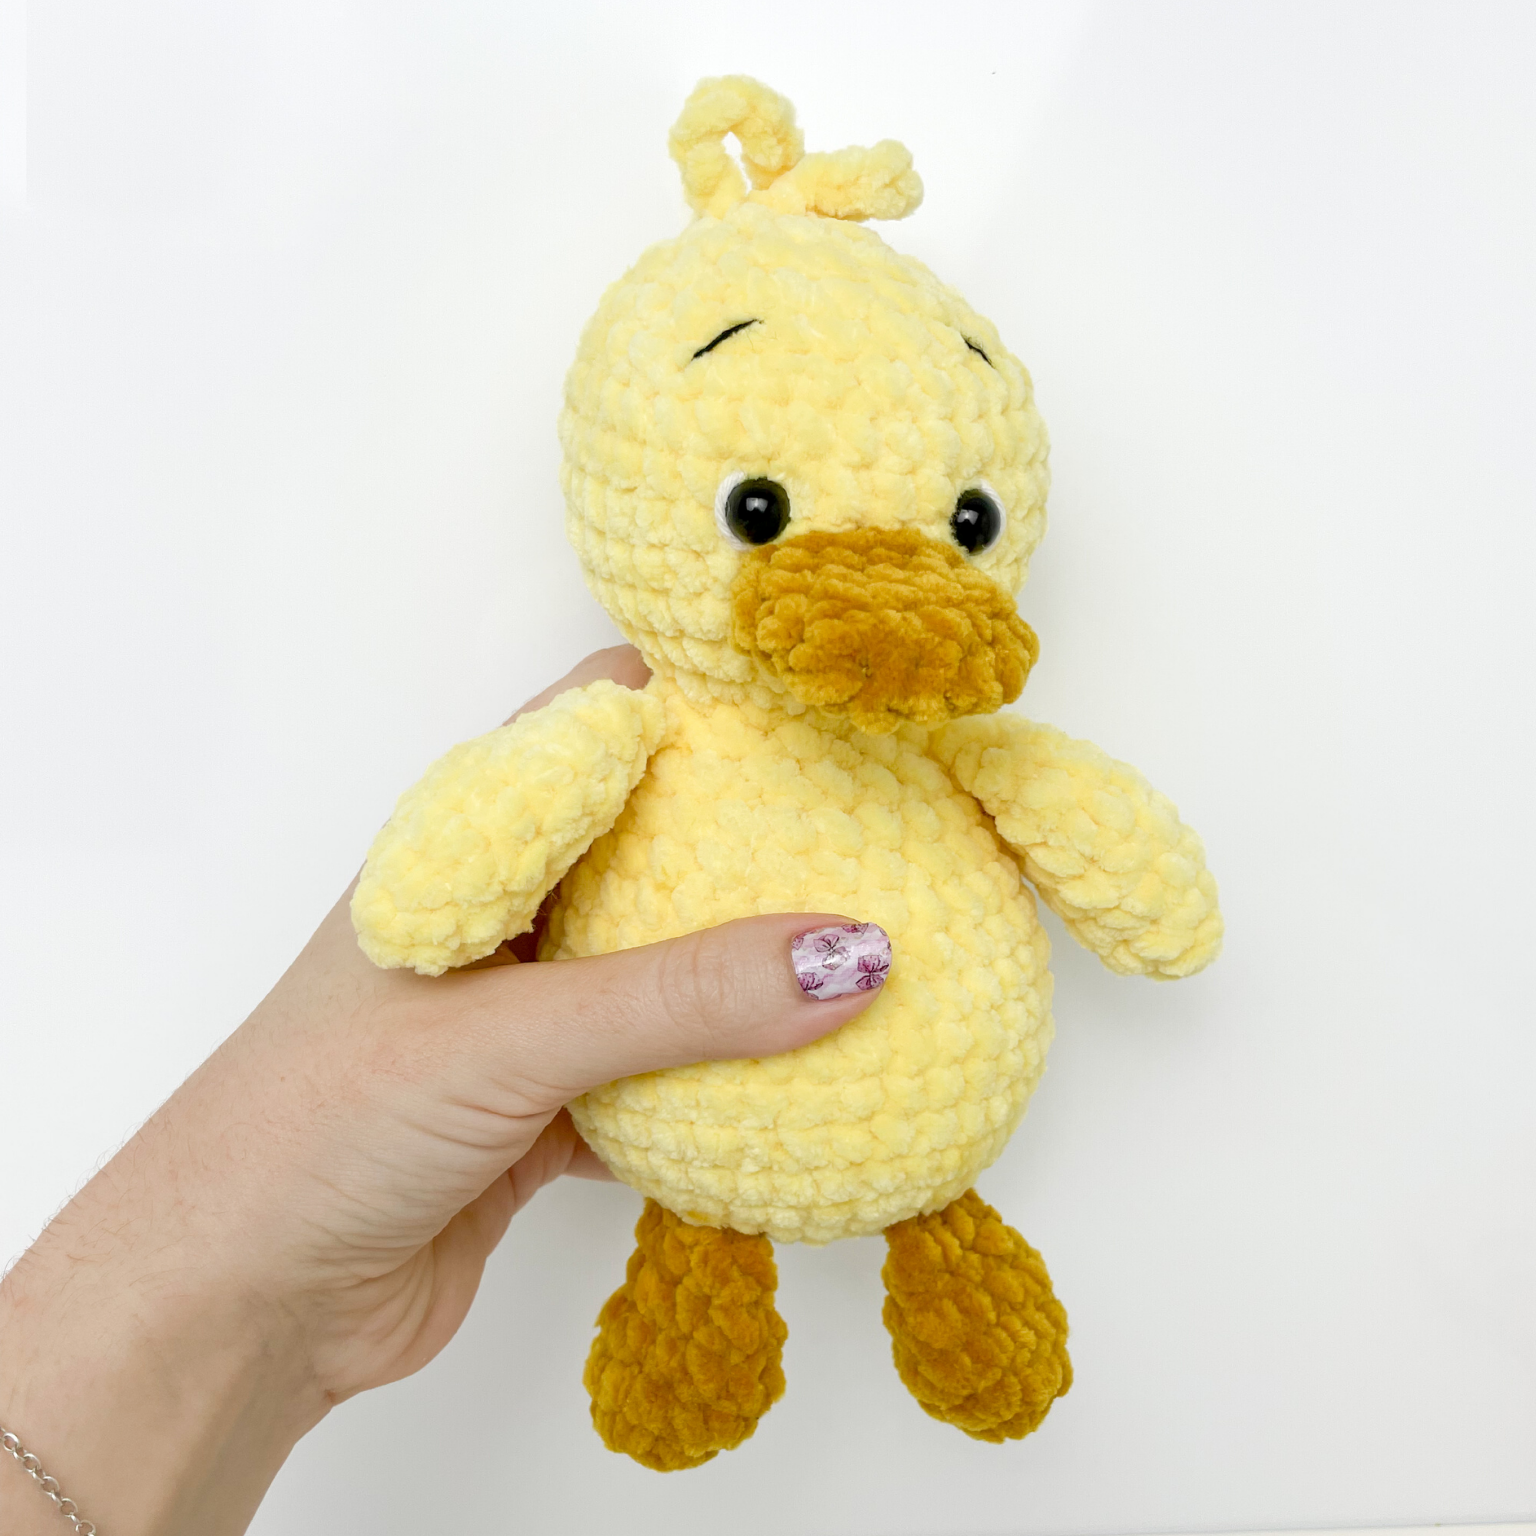
Ears - Make 2
R1: 6 SC in a MR R2: (SC, inc) x 3 (9) R3: 9 SC R4: (2 SC, inc) x 3 (12) R5-7: 12 SC (3 rounds of 12) R8: (SC, dec) x 4 (8)
First ear only:
Sl st to close Cut the yarn, leaving a tail for sewing
Second ear only: Join to 1st ear with a SC (This is 1st st of R1 of head)
Head
(First st was done in previous step)
R1: (2SC, dec) x 4 (12) R2: 12 inc (24) R3-6: 24 SC (4 rounds of 24) Sew hole closed using tail from end of first ear
Stuff ears
R7: 12 dec (12) R8: 12 SC Attach eyes between R5 and R6, 5 sts apart
Stuff R9: (SC, inc) x 6 (18) R10: (2SC, inc) x 6 (24) R11-R16: 24 SC (6 rounds of 24) R17: (SC, dec) x 8 (16) Stuff R18: 8 dec (8) Close and cut the yarn, leaving a tail for sewing Sew the hole closed
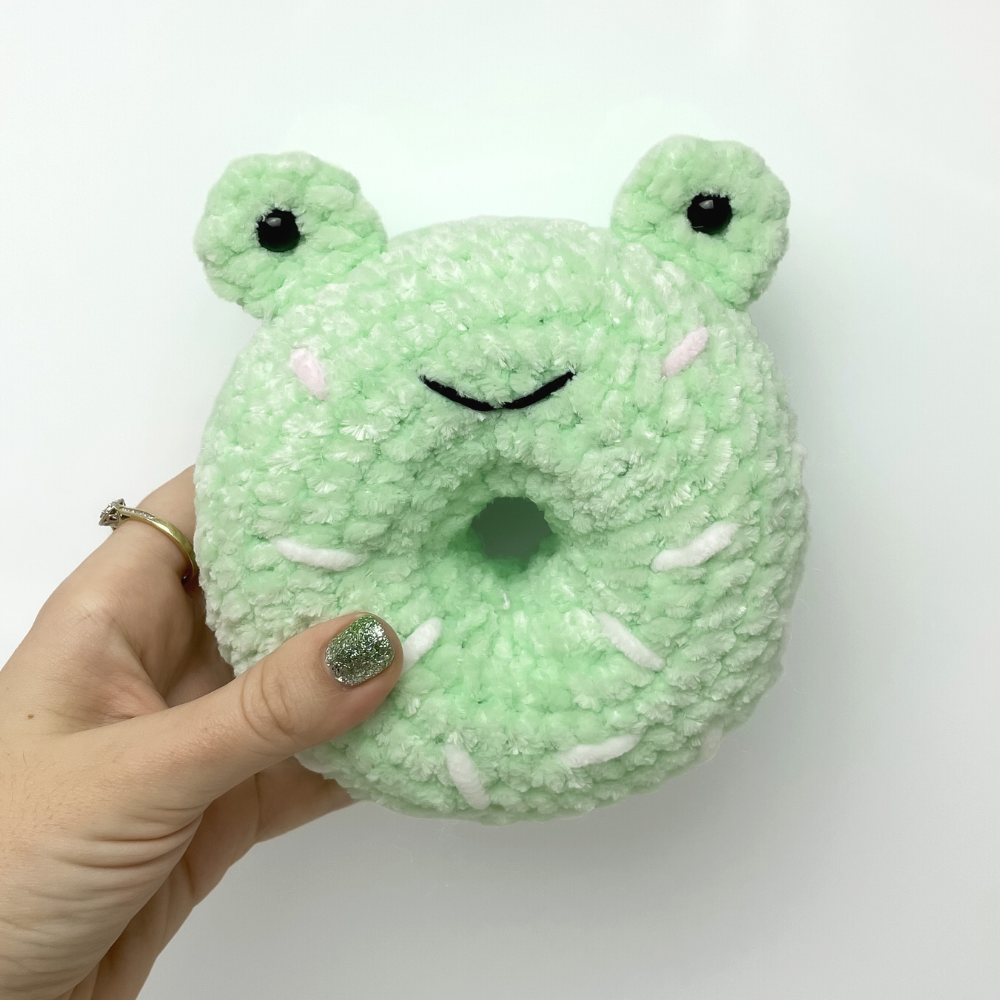
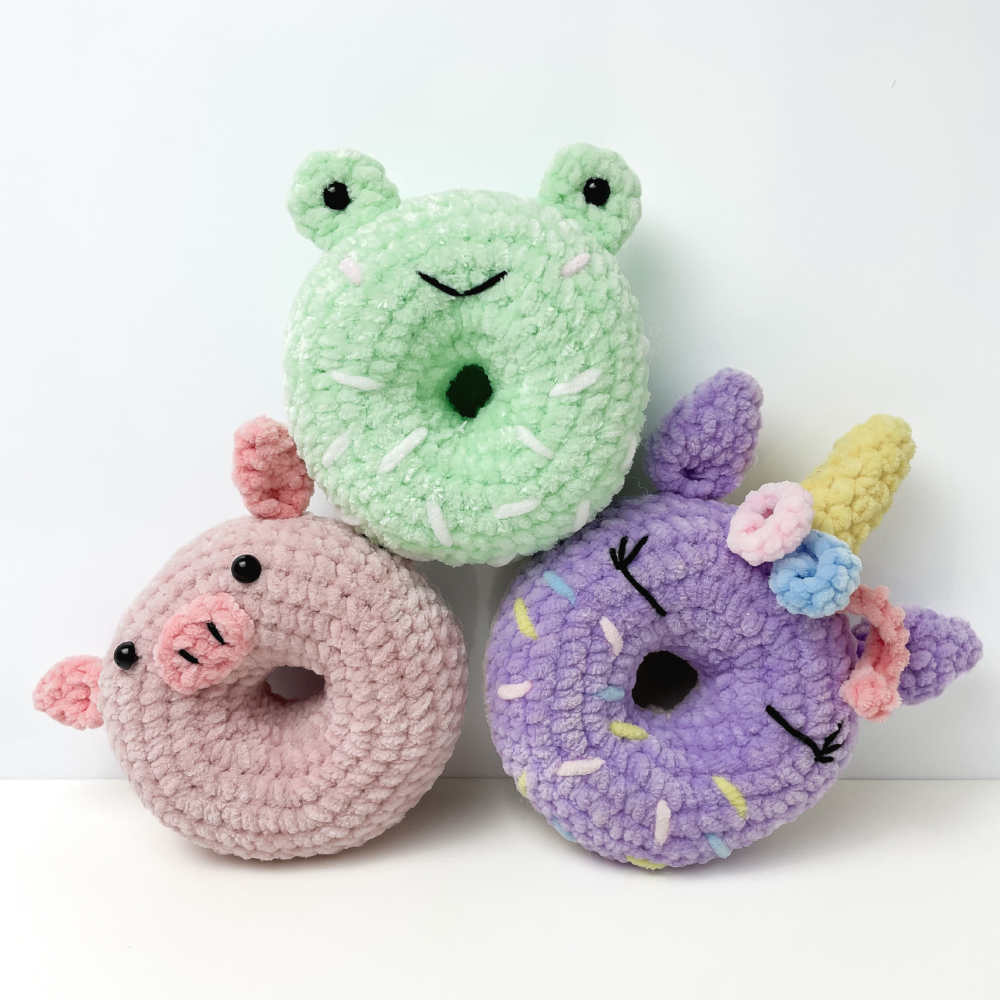
This is a crochet pattern to make this cute little donut frog!
You'll need to start by making the plain donut. You can find the pattern for the basic donut here. There is a full Youtube tutorial to create the basic donut here
*Please note that safety eyes are NOT recommended for children under the age of 3 years.
Abbreviations and stitches
• MR: Magic ring • St(s): Stitch(es) • SC: Single crochet • Inc: Increase (Stitch 2 SC into the stitch)
• (...) x n: Repeat instructions in brackets n times **This pattern uses US Crochet Terms**
Pattern
Create the original donut body as per the basic donut pattern, in green BUT: - don't embroider the sprinkles yet; we'll do it at the end
Eyes - make 2
R1: 6 SC in a MR R2: 6 inc (12) R3: 12 SC R4: (2 SC, dec) x 3 (9)
Close with a sl st. Cut the yarn, leaving a tail for sewing. Attach the safety eyes between R2 and R3 on each eye.
Assembly
Sew the eyes on to the top of the donut, at the seam of the two donut halves. The eyes should be about 5 or 6 sts apart.
Embroider the mouth using black medium weight yarn (I like to have the top of the mouth between R4 and R5, and the bottom point of the mouth to be between R3 and R4)
Embroider the cheeks using pink yarn.
Embroider the sprinkles randomly around the donut as desired.
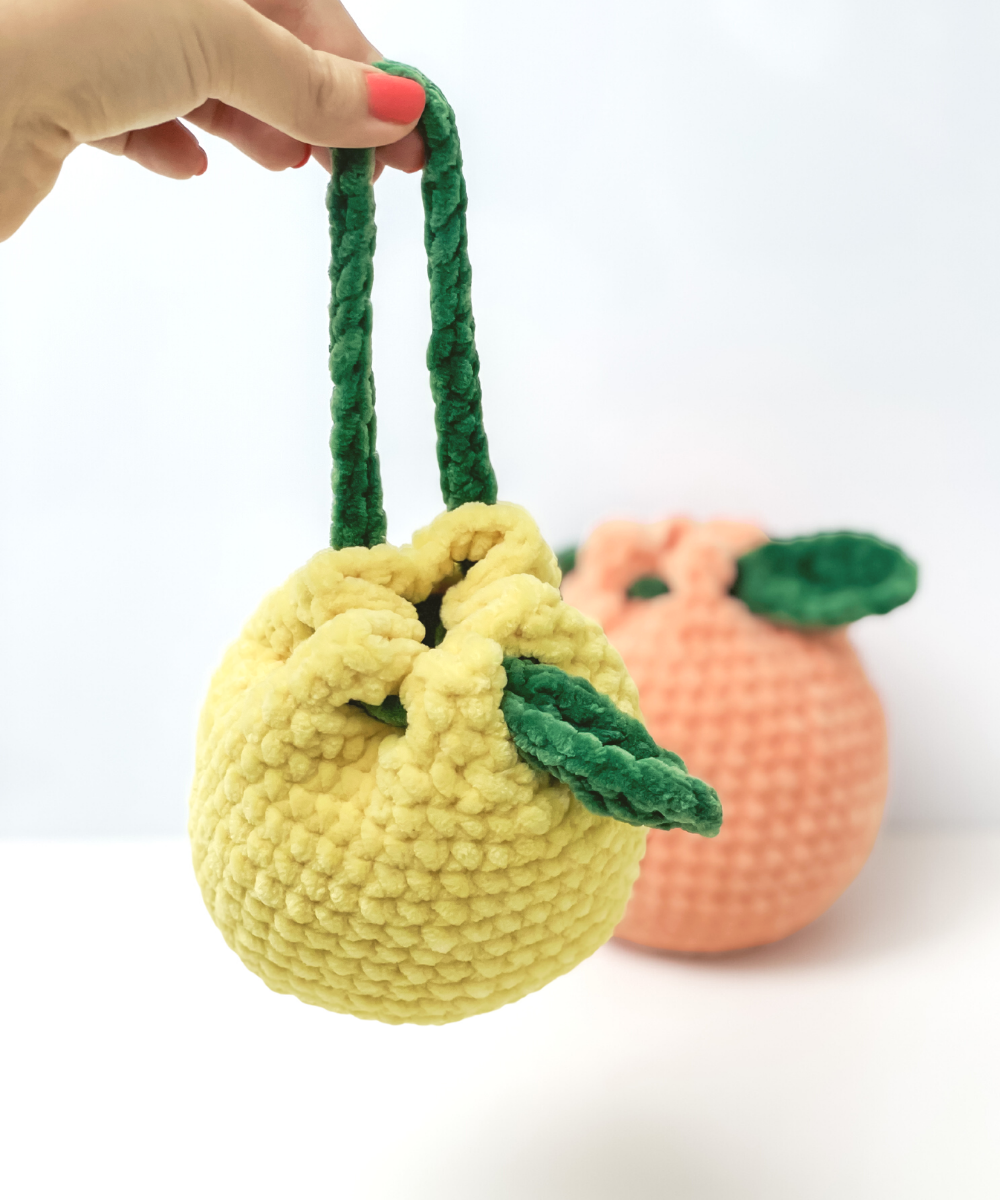
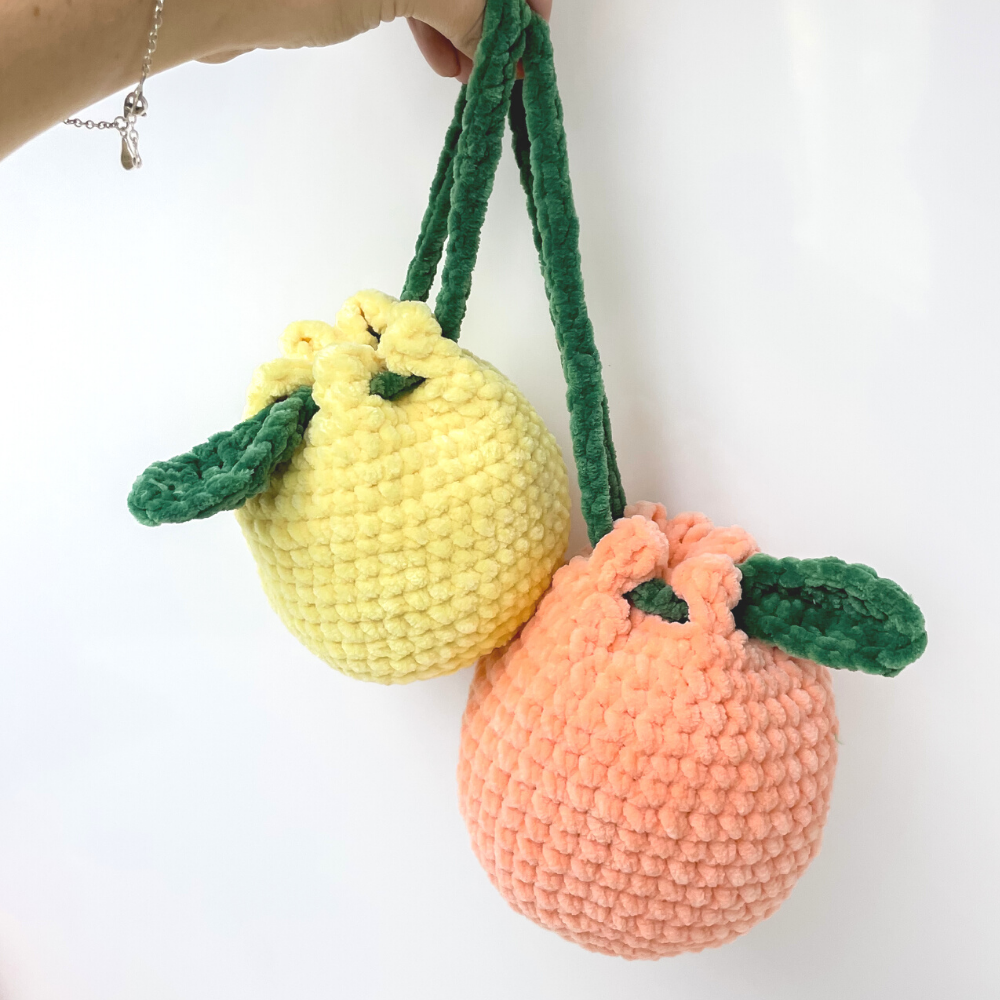
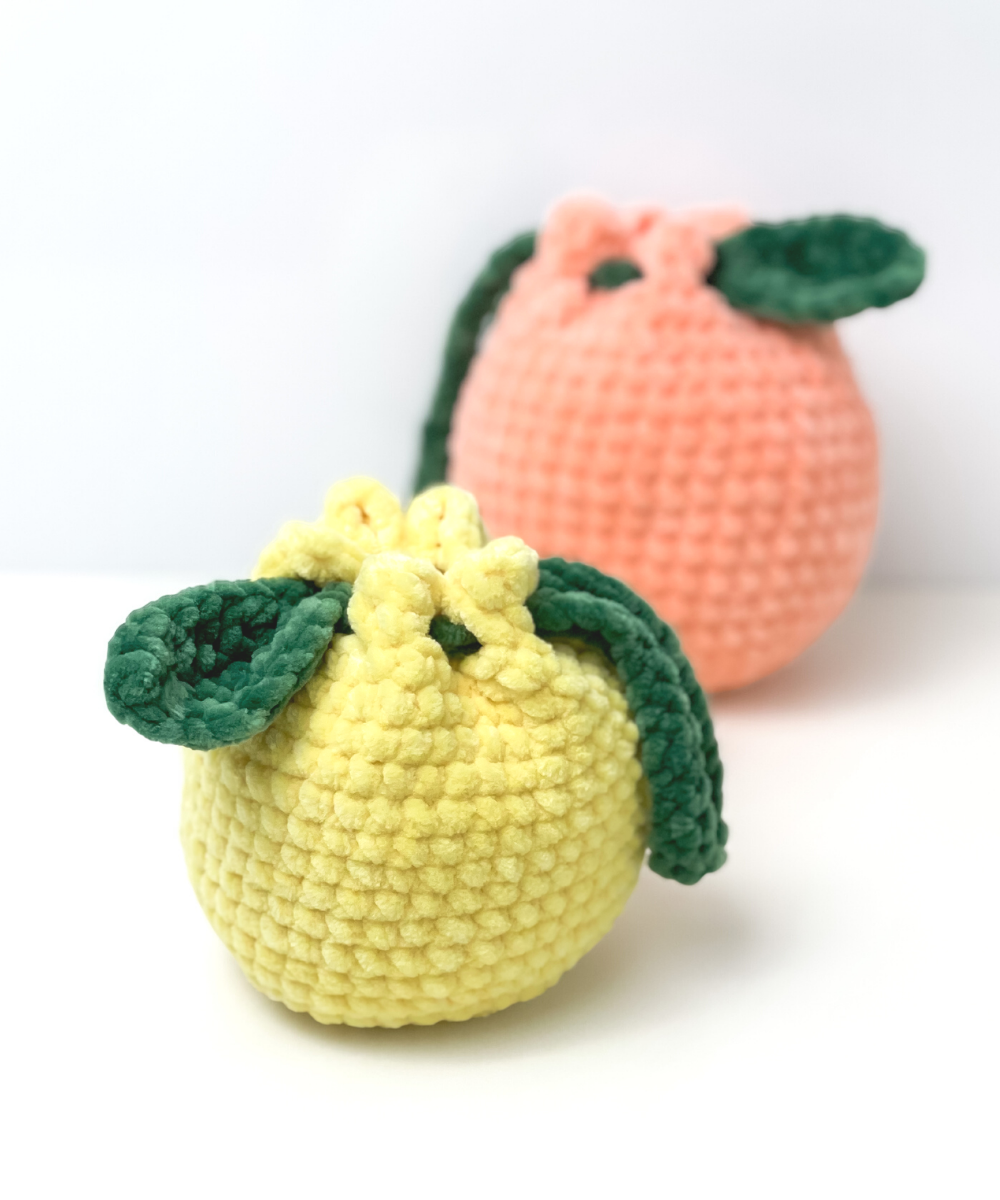
This is a crochet pattern to make this adorable drawstring fruit pouch. You can make it in all sorts of colours to make different fruits!
Pictured I have a peach and a lemon. Use dark purple to make a plum, orange to make an orange, green or red to make an apple, or even pink with white to make dragon fruit. The options are endless...
With this plush yarn, the pouch is large enough to fit a lipstick and some AirPods, to fit easily inside your purse. The lemon I made, using Hobbii Baby Snuggle, measures at 14cmx14cm. The peach I made, using Premier Parfait Chunky, measures at 16cmx16cm. If you use thicker yarn and a bigger hook, it could even fit your phone.
- US G/4.25mm Crochet Hook (or a hook to match the yarn you're using)
- Yarn needle - Stitch markers -optional
Abbreviations and stitches
• MR: Magic ring • St(s): Stitch(es) • SC: Single crochet
• Ch: Chain Stitch • Sl St: Slip Stitch • Sk: Skip a stitch • DC: Double Crochet • HDC: Half Double Crochet • Inc: Increase (Stitch 2 SC into the stitch) • (...) x n: Repeat instructions in brackets n times **This pattern uses US Crochet Terms**
Pattern
Pouch
R1: 6 SC in a MR R2: 6 inc (12) R3: (SC, inc) x 6 (18) R4: (2SC, inc) x 6 (24) R5: (3SC, inc) x 6 (30) R6: (4SC, inc) x 6 (36) R7: (5SC, inc) x 6 (42)
R8-17: 42 SC (10 rounds of 42) R18: (19SC, dec) x 2 (40) R19: 40SC R20: (2SC, ch 2, sk 2) x 10 (40) R21: (2SC, 2SC in ch space) x 10 (40) Sl st to close Weave in the ends
Leaf Drawstring
Ch 8 Start in 2nd ch from hook: SC (mark this st), 2 HDC, 2DC, HDC, 3 SC in last ch, Underside: HDC, 2 DC, 2 HDC, SC
Chain between 40 and 50 depending on desired length Start in 2nd ch from hook: Sl st back along chain
Sl st back to 1st marked SC Close, leaving a tail for sewing
Thread strap through the holes at the top of the pouch
Use the yarn tail from the base of the leaf to sew it to the start of the strap
This is a crochet pattern to make this super cute donut pig!
You'll need to start by making the plain donut. You can find the pattern for the basic donut here. There is a full Youtube tutorial to create the basic donut here
Then we add on the ears, snout and tail!
There is a full video on the steps to create the donut pig here!
Yarn used
James C Brett Flutterby Chunky:
- Light pink (body)
- Medium pink (ears, snout, tail)
Rainbow Cotton 8/4
- Black (nostrils)
Other Items used
- US G/4.25mm Crochet Hook
- 9mm safety eyes
- Yarn needle - Poly fill
- Stitch markers -optional
*Please note that safety eyes are NOT recommended for children under the age of 3 years.
Abbreviations and stitches
• MR: Magic ring • St(s): Stitch(es) • SC: Single crochet • Inc: Increase (Stitch 2 SC into the stitch)
• (...) x n: Repeat instructions in brackets n times **This pattern uses US Crochet Terms**
Pattern
Create the original donut body as per the basic donut pattern, in light pink BUT: - no sprinkles (or only sprinkles on bottom half) - attach safety eyes on one half before sewing together - Between R5 and R6 - 8 sts apart
Snout
In medium pink yarn: Ch 5. SC in 2nd ch from hook, 2SC back along ch, 3SC in last ch Underside: 2SC, inc, sl st back to 1st st Close and cut the yarn, leaving a long tail for sewing
Ears - Make 2
In medium pink yarn: R1: 4SC in a MR R2: (SC, inc) x 2 (6) R3: (2SC, inc) x 2 (8) R4: 8SC
Fold flat, and SC across top to close Close and cut the yarn, leaving a long tail for sewing
Assembly
Sew the snout on to the donut, just below the eyes Sew the ears on to the top of the donut, slightly further apart than the eyes Embroider the nostrils, using black yarn
Tail
Attach the yarn at the back of the donut, and ch 11. Starting in 2nd ch from hook: SC back along ch (10) Close and cut the yarn. Knot the tails together, and pull the knot into the piece.
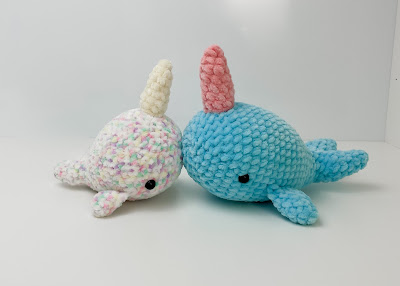
Then follow the pattern below to make the horn, and attach it to the whale to make a narwhal!
There is a full Youtube tutorial for this narwhal here
Yarn used
James C Brett Flutterby Chunky
- Small amount for the horn
Other Items used
- US G/4.25mm Crochet Hook
- Yarn needle - Poly fill
- Stitch markers -optional
Abbreviations and stitches
• MR: Magic ring • St(s): Stitch(es) • SC: Single crochet • Inc: Increase (Stitch 2 SC into the stitch)
• (...) x n: Repeat instructions in brackets n times **This pattern uses US Crochet Terms**
Pattern (Horn)
R1: 4 SC in a MR R2: (SC, inc) x 2 (6) R3-4: 6SC R5: (2SC, inc) x 2 (8) R6-8: 8SC
Sl st to close. Cut the yarn, leaving a long tail for sewing. Stuff the horn Sew the horn to the top of the whale’s head, about 4 to 5 rounds from the last round on the head.
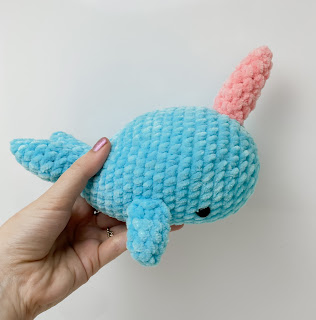
This is a crochet pattern to make this super cute, super chonky whale.
I have wanted to design a whale for a while, but couldn't work out whether to design it from the back to the front, front to back, or top to bottom! Each way of working up the whale has various benefits in terms of the overall shape. Eventually I decided to start at the tail, and then work towards the body, making the body increase towards the top to give this cute chunky shape! The tail naturally curves up as well, which makes it super cute.
There's very little sewing in this pattern. You only need to sew on the fins at the end. That's a win in my books!
You can even turn this whale into a narwhal! To make the horn for the narwhal, you can use the horn pattern here.
There is a full Youtube tutorial to create this whale here
Yarn used
James C Brett Flutterby Chunky
- Less than half of a 100g skein
Other Items used
- US G/4.25mm Crochet Hook
- 9mm safety eyes
- Yarn needle - Poly fill
- Stitch markers -optional
*Please note that safety eyes are NOT recommended for children under the age of 3 years.
Abbreviations and stitches
• MR: Magic ring • St(s): Stitch(es) • SC: Single crochet • Inc: Increase (Stitch 2 SC into the stitch)
• Dec: Decrease using the invisible method
• (...) x n: Repeat instructions in brackets n times **This pattern uses US Crochet Terms**
Pattern
We crochet the whale starting at the tail fins, and moving towards the front.
Tail fins
- Make 2
R1: 4 SC in a MR R2: (SC, inc) x 2 (6) R3: (2SC, inc) x 2 (8) R4: 8 SC R5: (3SC, inc) x 2 (10) R6: 10SC
For the first tail fin only: Close and cut the yarn after R6, leaving a tail for sewing
For the second tail fin only: Don’t close after R6. Join to 1st tail fin with 1SC (this is first st of R1 of body - place a marker in this st)
For more detailed instruction on joining the tail fins, please see the video tutorial
Body
Continue straight on to the body The first st of R1 was done in the previous step to join the tail fins together
R1: (2SC, dec) x 5 (15) (This means it’s 2SC, dec, 2SC, dec, 2SC on 1st fin, and dec, 2SC, dec, 2SC, dec on 2nd fin)
R2: (3SC, dec) x 3 (12) (The first st of R2 goes into the marked SC used to join the tail fins)
Use the tail from the end of the first fin to sew the hole between the tail fins closed
R3: 12 SC R4: (SC, inc) x 6 (18) Make a few sts to get to the middle of the bottom of the whale, right between the tail fins. This is your new end of round 4
Make a few sts to get to middle of the bottom of the whale. This is your new end of round 7
R8: 6SC, inc, 3SC, inc, (2SC, inc) x 3, 3SC, inc, 6SC (36) R9: 11SC, inc, 12SC, inc, 11SC (38) R10: (12SC, inc) x 2, 12SC (40) R11: 13SC, inc, 12SC, inc, 13SC (42) R12-18: 42SC (7 rounds of 42) R19: (5SC, dec) x 6 (36) R20: (4SC, dec) x 6 (30) R21: (3SC, dec) x 6 (24)
Partly stuff the whale
R22: (2SC, dec) x 6 (18)
Attach the eyes, between R18 and R19, 12 sts apart, at the underside of the whale
R23: (SC, dec) x 6 (12) Finish stuffing the whale R24: 6 dec (6) Close and cut the yarn, leaving a tail for sewing. Sew the hole closed and weave in the end.
Fins
- Make 2
R1: 4 SC in a MR R2: 4 inc (8) R3-5: 8 SC (3 rounds of 8)
Fold the fin flat, and SC along both sides to close.
Close and cut the yarn, leaving a tail for sewing.
Assembly
Sew the fins to the sides of the whale, starting about 3 sts behind the eyes.